
Pay attention.
There are several applications or services that you use and those services often send emails.
Some even reach your mailbox.
Example:
When you rarely open Facebook, Facebook will send an email.
When you register for a service, you will receive an email from the service.
Do they send manually?
The answer: No .
Who will be able to send emails to thousands or millions of users?
Can you afford it?
Yes, able to use the program.
This program is what we will make in this tutorial.
Email sending programs are usually needed for some case studies such as:
- Reset Password;
- Email Marketing;
- Contact Form;
- Account Verification;
- etc.
In this tutorial, we will learn how to send email at nodejs using modules
nodemailerand services gmail.
Let's start…
Initial Preparation
Please create a new project by creating a directory named 
nodejs-email.mkdir nodejs-email && cd nodejs-email
Then install it
nodemailerthere.npm install nodemailer
Wait until the installation process is complete.
Make the Nodejs Program to Send Email
Please create a new file named 
send_email.js, then fill in the following code:var nodemailer = require('nodemailer');
var transporter = nodemailer.createTransport({
    service: 'gmail',
    auth: {
        user: 'youremail@gmail.com',
        pass: 'your password'
    }
});
var mailOptions = {
    from: 'youremail@gmail.com',
    to: 'yourfriend@gmail.com',
    subject: 'Sending Email using Nodejs',
    text: 'That was easy!'
};
transporter.sendMail(mailOptions, (err, info) => {
    if (err) throw err;
    console.log('Email sent: ' + info.response);
});
Explanation:
First, we need a module
nodemailer. Then we import with functions reqiuire().var nodemailer = require('nodemailer');
Then after that, we create an object
transporter:var transporter = nodemailer.createTransport({
service: 'gmail',
auth: {
user: 'youremail@gmail.com',
pass: 'your password'
}
});
This object will later be in charge of sending email.
Note the parameters given to the object
transporter.
Please change the email address and password according to the email and password you have.
Next, we create objects
mailOptions.var mailOptions = {
from: 'youremail@gmail.com',
to: 'yourfriend@gmail.com',
subject: 'Sending Email using Nodejs',
text: 'That was easy!'
};
This object will accommodate the email data that we will send.
Like the origin address, destination address, subject, text, and attachments that will be sent.
Finally ...
We send the email with the function
sendMail().transporter.sendMail(mailOptions, (err, info) => {
if (err) throw err;
console.log('Email sent: ' + info.response);
});
Send Email Trial
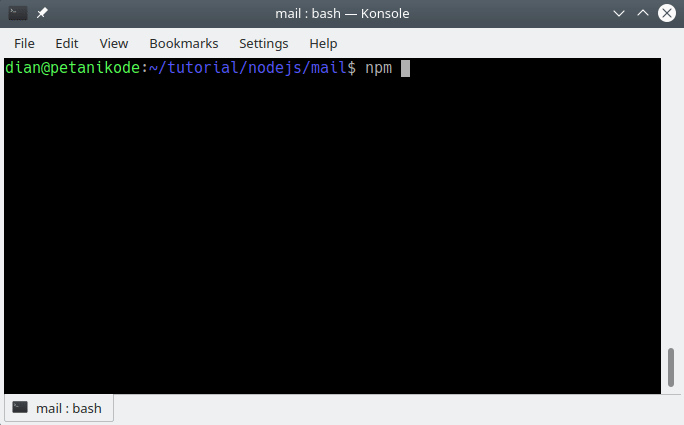
Now try to execute the program ...
If you get an error like this:
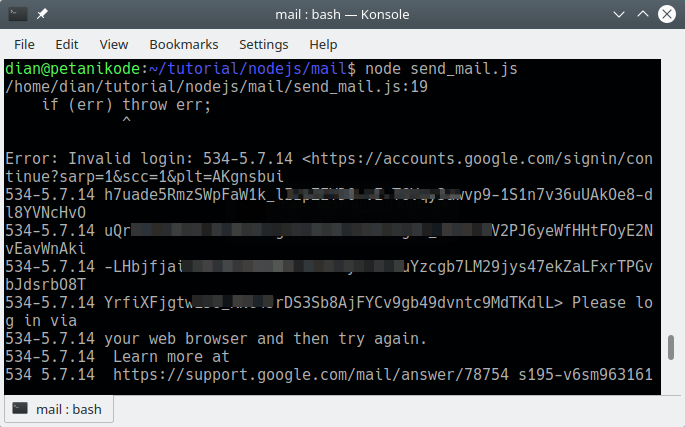
This means, we failed to log in to the Gmail account.
There are several possibilities:
- The password is wrong;
- Security settings in Gmail that do not allow third party applications.
- Internet connection;
Try checking again ...
Activate this section:
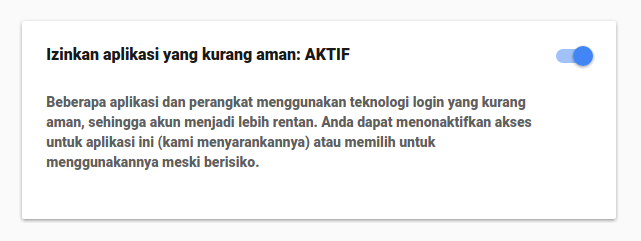
After a few minutes, try again ...
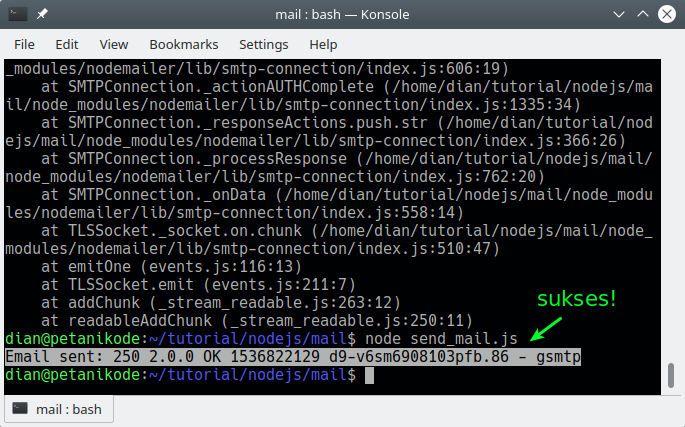
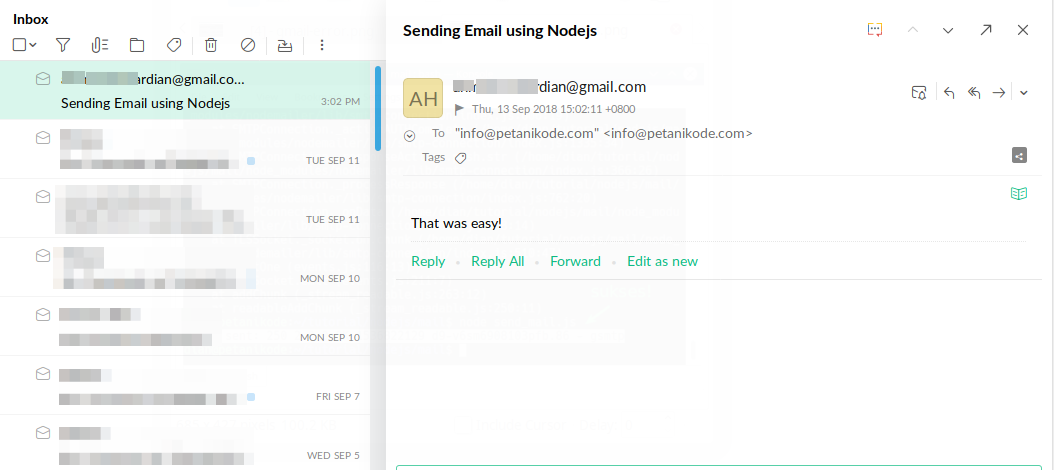
Send email successfully. 
To be sure, try checking the destination email inbox.
Send Advanced Email
Okay, we have successfully sent an email ...
However, there are a few more things we need to discuss:
Send Emails to Many People
To send e-mail to many people or recipients, we simply fill in the recipient's e-mail address in the property
to at mailOptions: 1var mailOptions = {
from: 'youremail@gmail.com',
to: 'myfriend@yahoo.com, myotherfriend@yahoo.com',
subject: 'Sending Email using Node.js',
text: 'That was easy!'
}
Separate the recipient's address with a comma.
Send e-mail containing HTML
To send e-mail with HTML content, we only need the property to
textbe html.var mailOptions = {
from: 'youremail@gmail.com',
to: 'myfriend@yahoo.com',
subject: 'Sending Email using Node.js',
html: '<h1>Welcome</h1><p>That was easy!</p>'
}
Tip: We can also use HTML templates from external files. Use the module
fsto read HTML files.
Try students in: Tutorial Nodejs # 5: Read Write Files with the File System Module
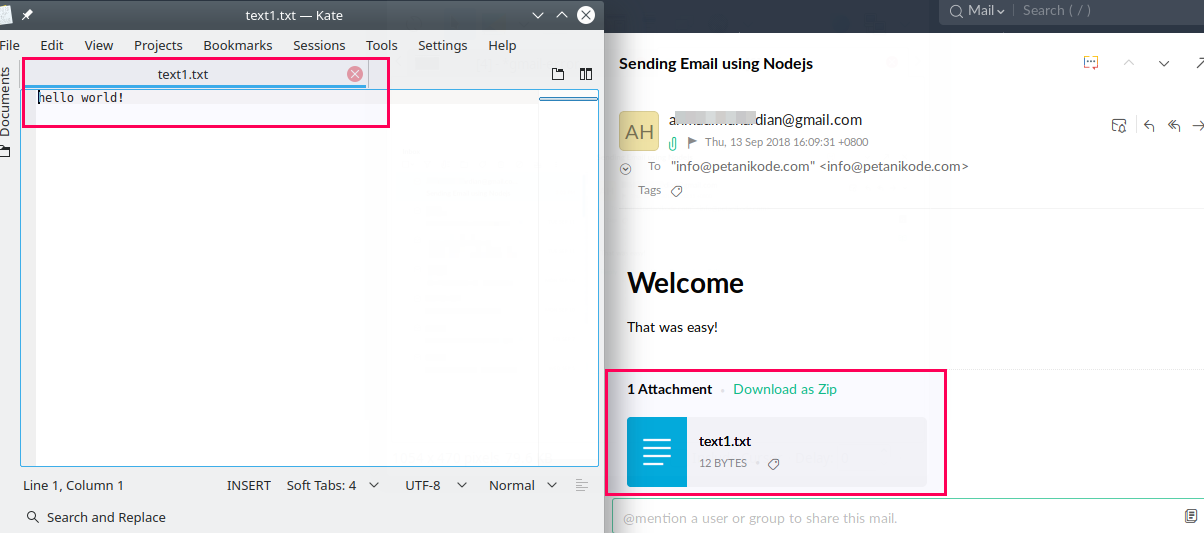
Sending Attachments
To send an attachment (attachment) , we can add the property
attachmentson mailOptions.
The contents of the property
attachmentsare an array of file objects to be attached.
Here is the code I got from the Nodemailer documentation. 2
let message = {
    ...
    attachments: [
        {   // utf-8 string as an attachment
            filename: 'text1.txt',
            content: 'hello world!'
        },
        {   // binary buffer as an attachment
            filename: 'text2.txt',
            content: new Buffer('hello world!','utf-8')
        },
        {   // file on disk as an attachment
            filename: 'text3.txt',
            path: '/path/to/file.txt' // stream this file
        },
        {   // filename and content type is derived from path
            path: '/path/to/file.txt'
        },
        {   // stream as an attachment
            filename: 'text4.txt',
            content: fs.createReadStream('file.txt')
        },
        {   // define custom content type for the attachment
            filename: 'text.bin',
            content: 'hello world!',
            contentType: 'text/plain'
        },
        {   // use URL as an attachment
            filename: 'license.txt',
            path: 'https://raw.github.com/nodemailer/nodemailer/master/LICENSE'
        },
        {   // encoded string as an attachment
            filename: 'text1.txt',
            content: 'aGVsbG8gd29ybGQh',
            encoding: 'base64'
        },
        {   // data uri as an attachment
            path: 'data:text/plain;base64,aGVsbG8gd29ybGQ='
        },
        {
            // use pregenerated MIME node
            raw: 'Content-Type: text/plain\r\n' +
                 'Content-Disposition: attachment;\r\n' +
                 '\r\n' +
                 'Hello world!'
        }
    ]
}
Let's try sending a file
txtthat contains Hello World.
Here is the code:
var nodemailer = require('nodemailer');

var transporter = nodemailer.createTransport({
    service: 'gmail',
    auth: {
        user: 'youremail@gmail.com',
        pass: 'your password'
    }
});

var mailOptions = {
    from: 'youremail@gmail.com',
    to: 'yourfriend@gmail.com',
    subject: 'Sending Email using Nodejs',
    html: '<h1>Welcome</h1><p>That was easy!</p>',
    attachments: [
        {
            filename: 'text1.txt',
            content: 'hello world!'
        }
    ]
};

transporter.sendMail(mailOptions, (err, info) => {
    if (err) throw err;
    console.log('Email sent: ' + info.response);
});
Try execution:

The result:
Steady 
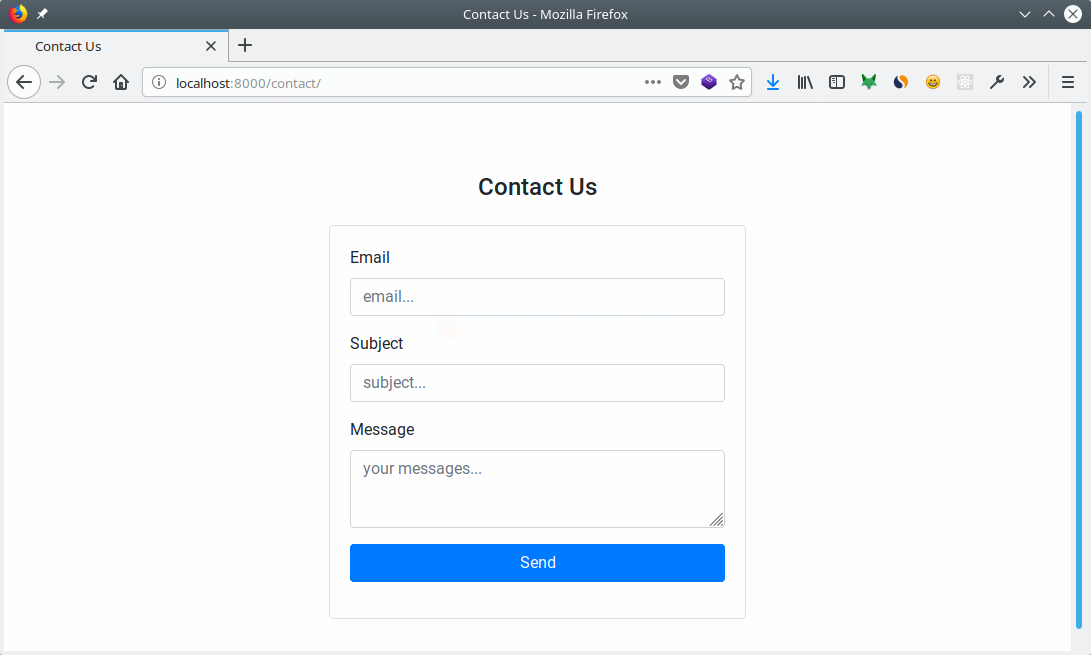
Bonus: Creating a Contact Form Application
Now, let's try sending emails for case studies in the real world.
Namely: create a contact form.
Please create a new file with the name
contact_form.html as follows:<!DOCTYPE html>
<html lang="en">
<head>
<meta charset="UTF-8">
<meta name="viewport" content="width=device-width, initial-scale=1.0">
<meta http-equiv="X-UA-Compatible" content="ie=edge">
<title>Contact Us</title>
<link rel="stylesheet" href="https://stackpath.bootstrapcdn.com/bootstrap/4.1.3/css/bootstrap.min.css" integrity="sha384-MCw98/SFnGE8fJT3GXwEOngsV7Zt27NXFoaoApmYm81iuXoPkFOJwJ8ERdknLPMO"
crossorigin="anonymous">
</head>
<body>
<div class="container p-5">
<div class="row justify-content-center">
<div class="col-6">
<h4 class="text-center my-4">Contact Us</h4>
<div class="card">
<div class="card-body">
<form action="/contact/" method="POST">
<div class="form-group">
<label for="email">Email</label>
<input type="email" class="form-control" name="email" placeholder="email..." required />
</div>
<div class="form-group">
<label for="subject">Subject</label>
<input type="text" class="form-control" name="subject" placeholder="subject..."
required />
</div>
<div class="form-group">
<label for="message">Message</label>
<textarea class="form-control" name="message" placeholder="your messages..." required></textarea>
</div>
<div class="form-group">
<input type="submit" class="btn btn-primary w-100" value="Send" />
</div>
</form>
</div>
</div>
</div>
</div>
</div>
</body>
</html>
In this HTML code, we use Bootstrap via the CDN. So that the display will look like this:
After creating the form, then make one more javascript file with the name
app_contact.jsand contents as follows:var http = require('http');
var fs = require('fs');
var qs = require('querystring');
var nodemailer = require('nodemailer');
http.createServer((req, res) => {
if(req.url === "/") {
// redirect ke halaman contact form
res.writeHead(302, {
'Location': '/contact/'
});
res.end();
}
// load the contact form
if(req.url === "/contact/" && req.method === "GET"){
fs.readFile("contact_form.html", (err, data) => {
if (err) throw err;
res.end(data);
});
}
// send the email
if(req.url === "/contact/" && req.method === "POST"){
var requestBody = '';
req.on('data', function(data) {
// tangkap data dari form
requestBody += data;
// kirim balasan jika datanya terlalu besar
if(requestBody.length > 1e7) {
res.writeHead(413, 'Request Entity Too Large', {'Content-Type': 'text/html'});
res.end('<!doctype html><html><head><title>413</title></head><body>413: Request Entity Too Large</body></html>');
}
});
req.on('end', function() {
let formData = qs.parse(requestBody);
// send the email
let transporter = nodemailer.createTransport({
service: 'gmail',
auth: {
user: 'youremail@gmail.com',
pass: 'your password'
}
});
let mailOptions = {
    from: formData.email,
    replyTo: formData.email,
    to: 'contactemail@gmail.com',
    subject: formData.subject,
    text: formData.message
};
transporter.sendMail(mailOptions, (err, info) => {
if (err) throw err;
console.log('Email sent: ' + info.response);
res.end("Thank you!");
});
});
}
}).listen(8000);
console.log('server listening on http://localhost:8000/');
What you need to pay attention to in this code is in the section
mailOptions:let mailOptions = {
from: formData.email,
replyTo: formData.email,
to: 'contactemail@gmail.com',
subject: formData.subject,
text: formData.message
};
The contents of the object
formDataare data that we input from the form.
If you don't understand, please learn: Tutorial Nodejs # 7: How to Retrieve Data from Form
Properties
replyToin mailOptionsfunction to specify email addresses that will be used to reply.
For more details, let's try ...

Then the email that will enter the inbox will be like this:
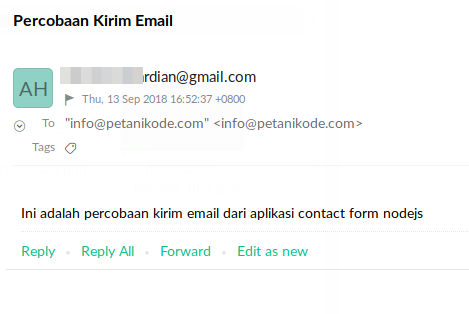
Then, when we press the reply button , this e-mail will be returned to the e-mail that we gave to the property
replyTo.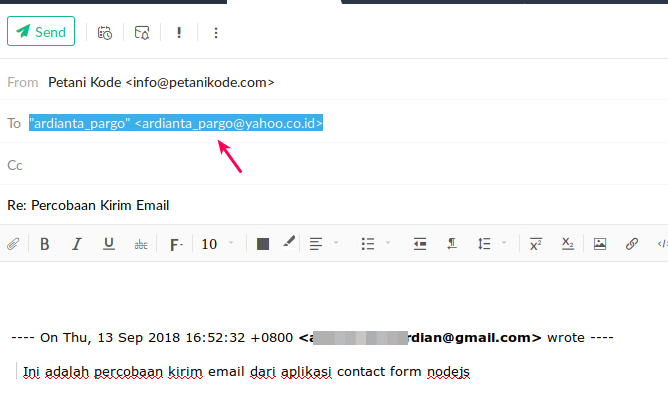
Reference: https://www.petanikode.com/nodejs-email/

0 Komentar untuk "Learning Nodejs # 10: How to send an email at Nodejs?"
Please comment according to the article