
In web development, we will not be able to escape from the URL.
URL is a text that states the address of a web or web page.
Here is an example URL:
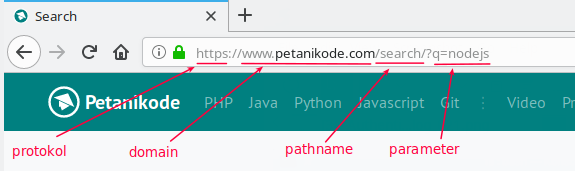
A URL consists of protocols, domains, path names, parameters, etc.
How do we parse (parsing) this URL in the program?
Let's discuss ...
Parsing URL at Nodejs
Nodejs has a named module
urlwhose function is to parse the URL into parts that we can use in the program.
The module is&
nbsp;
urlalready in Nodejs, so we don't need to install it via NPM (Node Package Manager) .
To be able to use the module
url, we must import it with a function require().var url = require('url');
Let's try ...
Make a named JavaScript file
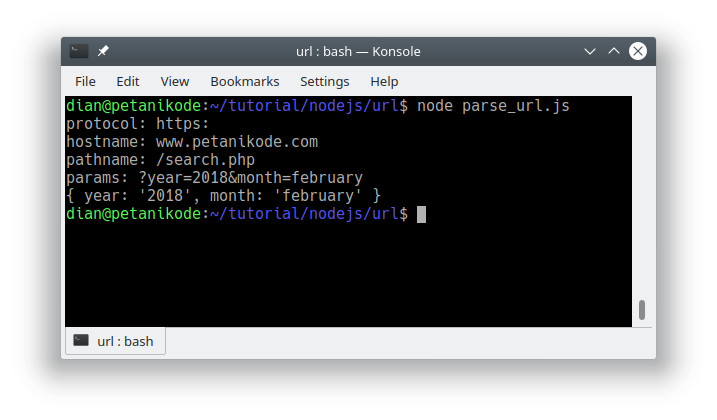
parse_url.js and fill in the following code:var url = require('url');
var adr = 'https://www.petanikode.com/search.php?year=2018&month=february';
var q = url.parse(adr, true);
//hasil parse URL
console.log("protocol: " + q.protocol);
console.log("hostname: " + q.host);
console.log("pathname: " + q.pathname);
console.log("params: " + q.search);
var qdata = q.query; // ambil query string sebagai objek
console.log(qdata);
After that, try executing:
In the above program, we use a function
url.parse()to parse the URL.
The function
url.parse()has two parameters:- String URL to be parsed;
- Boolean which is for parse parameter / query string. This parameter is optional or may not be filled. If filled
true, then the parameter / query string will be parsed into an object. 1
Then, after being parsed ...
... we display the parse results:
//hasil parse URL
console.log("protocol: " + q.protocol);
console.log("hostname: " + q.host);
console.log("pathname: " + q.pathname);
console.log("params: " + q.search);
Creating a Static Webserver
After knowing the functions and benefits of the module
url, we now try to create a static webserver.
This webserver will serve requests (HTTP Request) , then respond with static files.
Let's make ...
Please create a new file named
static_server.js, then fill in the following code:var http = require('http');
var url = require('url');
var fs = require('fs');
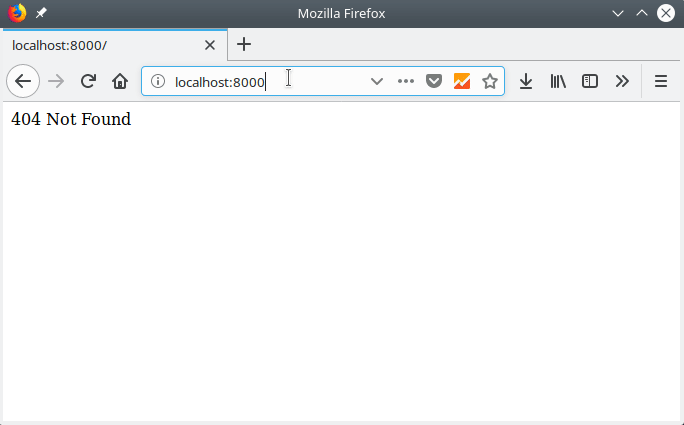
http.createServer(function (req, res) {
var q = url.parse(req.url, true);
var filename = "." + q.pathname;
// baca file
fs.readFile(filename, function(err, data) {
if (err) { // kirim balasan error
res.writeHead(404, {'Content-Type': 'text/html'});
return res.end("404 Not Found");
}
// kirim balasan dengan isi file statis
res.writeHead(200, {'Content-Type': 'text/html'});
res.write(data);
return res.end();
});
}).listen(8000);
console.log('server is running on http://localhost:8000');
Next create three files:
index.html, about.html, and contact.html.
Fill in the file 
index.html<!DOCTYPE html>
<html>
<head>
<title>Tutorial Nodejs</title>
</head>
<body>
<h1>Selamat datang di Tutorial Nodejs Petanikode</h1>
<p>Hello, kita sedang belajar tentang modul URL</p>
</body>
</html>
Fill in the file
about.html<!DOCTYPE html>
<html>
<head>
<title>Tentang Petanikode</title>
</head>
<body>
<h1>Tentang Petanikode</h1>
<p>Petanikode merupakan sebauh blog yang membahas tentang pemrograman menggunakan Linux</p>
</body>
</html>
Fill in the file
contact.html<!DOCTYPE html>
<html>
<head>
<title>Contact Petanikode</title>
</head>
<body>
<h1>Hubungi Kami</h1>
<p>Anda dapat menghubungi kami melalui email: <code>info@petanikode.com</code></p>
</body>
</html>
The result:
For the next experiment:
Try creating a new HTML file again and try opening it from the web.
Reference: https://www.petanikode.com/nodejs-url/


0 Komentar untuk "Learning Nodejs # 6: Using the URL Module to Create a Static Webserver"
Please comment according to the article