As a web developer 'age now' , there are various tools that we must master.
Among them are tools to automate, test , build , deploy , and so on.
One of the tools commonly used in web development is Gulp.
What is Gulp? and how do you use it?
Let's discuss ...
What is Gulp?
- Minify and optimization of HTML, CSS, Javascript files;
- Compile SASS files;
- Running Web Server;
- Reload the server automatically;
- Build and deploy projects;
- and so forth.
This task is run through the command line interface (CLI) .
Gulp installation
[sudo] npm install --g gulp-cli
If you install Nodejs on the root, use it
sudoin front. But if you install Nodejs on home, it is sudonot needed.
Wait until the process is complete. After that, try typing the command
gulp --version to make sure the version of Gulp is installed.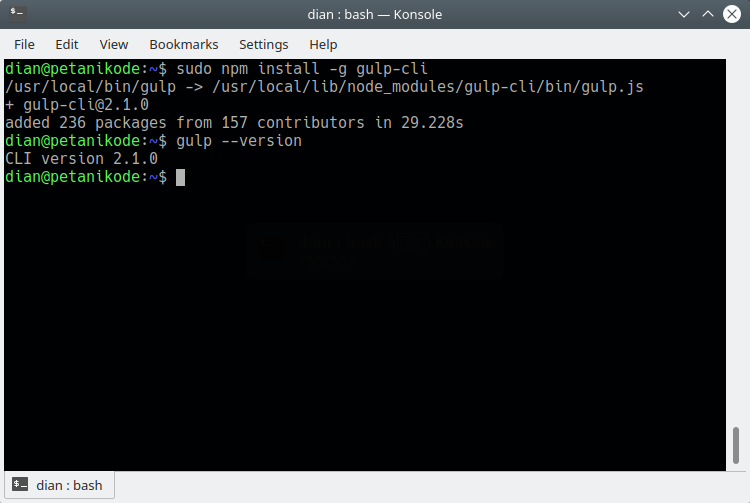
Creating a Javascript Project
Use the following command to create a new project:
npx mkdirp belajar-gulp
We will make the project by name
belajar-gulp. After that, enter the directory belajar-gulpwith the command cd.cd belajar-gulp
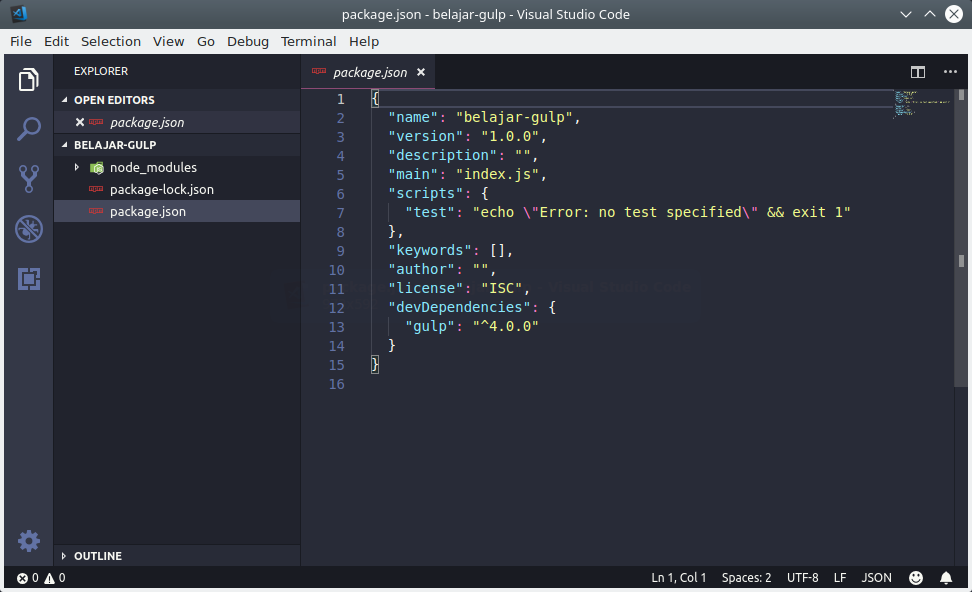
Now we are in the project directory. Next we will create a file
package.jsonusing npm.
Please type the following command:
npm init -y
Then it will look like this:
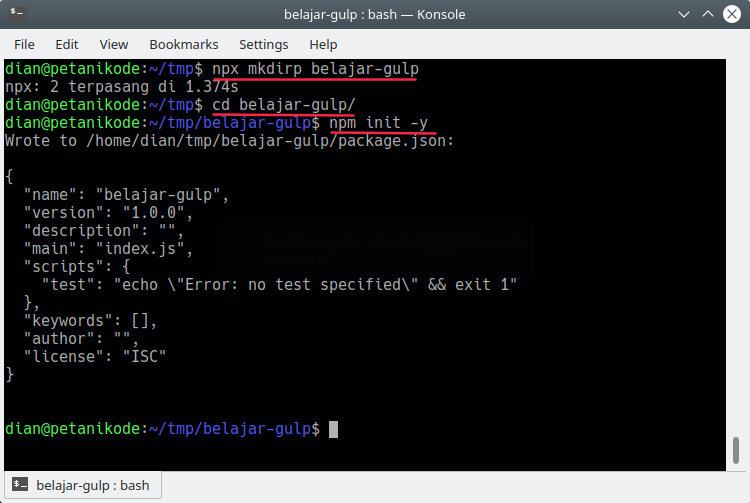
This means the project has been completed.
Gulp Installation in the Project
Next we have to install Gulp into the project.
How ...
Use the following command:
npm install --save-dev gulp
Wait until the process is complete. After that, try typing the command again
gulp --version.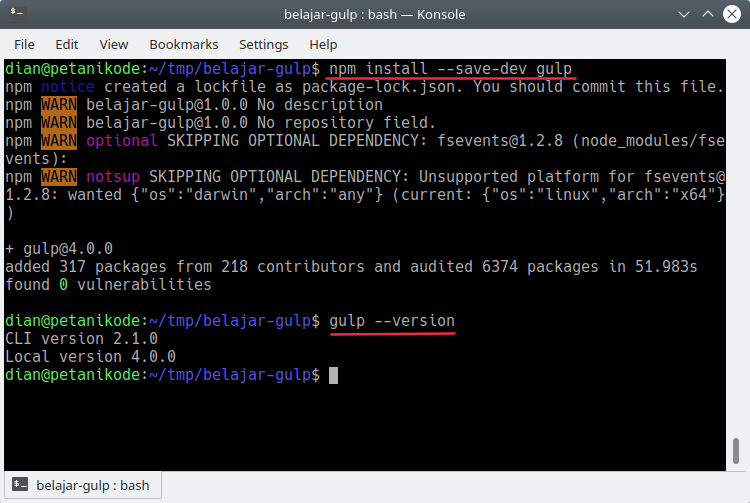
In the picture above, you can see two Gulp installed.
What's the difference between Gulp CLI and Local?
Gulp CLI is Gulp installed on our computer's operating system, while local Gulp is Gulp installed on the project.
Why do we have to install both?
Actually it doesn't have to be, because we can use just one.
Oh yeah, we will use the Gulp version
4.0.0. Make sure you also use the version.
Because there are many changes to the version
2, 3and 4.Create a Task for Gulp
Now open the project with the text editor. I will use VS Code.
Please open through File-> Open Folder .
Next, please create a new file with the name
gulpfile.js.
The file
gulpfile.jsis a file that contains the task for Gulp to do.
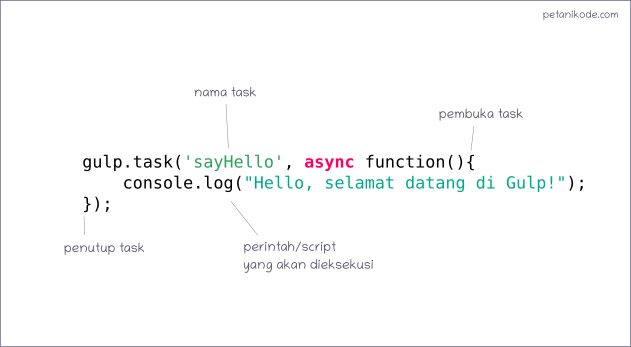
Now let's try making a task .
Type the following code inside
gulpfile.js:var gulp = require('gulp');
gulp.task('sayHello', async function(){
console.log("Hello, selamat datang di Gulp!");
});
This is a simple task for displaying messages
"Hello, selamat datang di Gulp!".
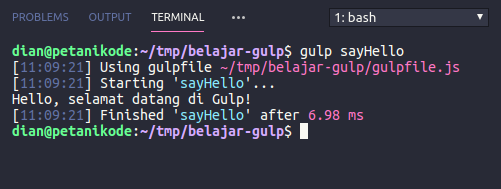
Now let's try execution.
Type the following command:
gulp sayHello
Then the result:
Anatomy gulpfile.js
We have succeeded in making the task inside
gulpfile.js. Now we will discuss more about gulpfile.js.
The file
gulpfile.jsconsists of three important parts:- Definition of plug-ins or modules;
- Definition of Task;
- Default Task.
Consider the following example:
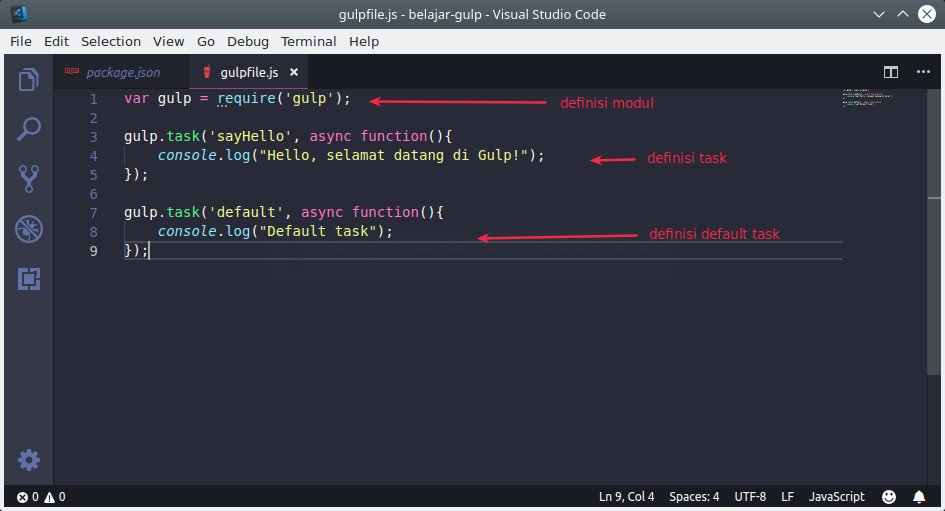
Plug-ins or modules we need to use certain functions. Later we will try several modules.
Task consists of the task name and body task. The body contains a script that will be executed when the file is executed.
Then the default task is the taks that will be executed when we don't give the task name when executing Gulp.
Next we will try some Gulp modules.
Make a Server with Gulp
To create a web server with Gulp, we need a module
gulp-connect.
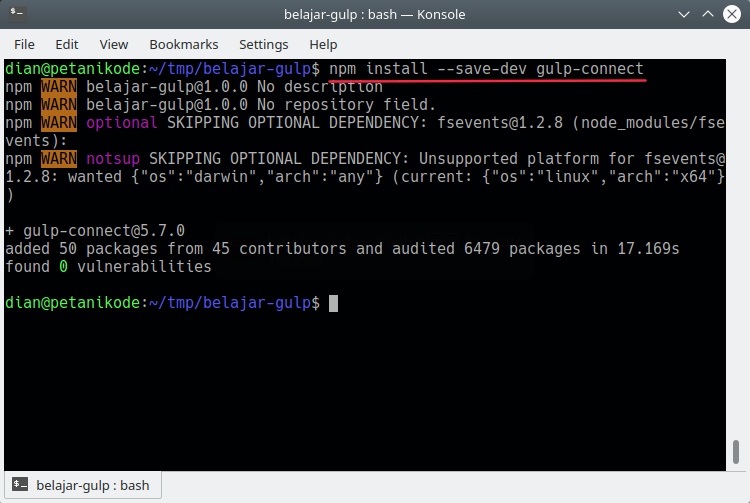
Please install this module with the following command:
npm install --save-dev gulp-connect
Wait until the process is complete.
Then add a task to run the server
gulpfile.jslike this:var gulp = require('gulp');
var gulpConnect = require('gulp-connect');
//--- ada script di sini ---
gulp.task('server', async function(){
gulpConnect.server({
root: "public",
livereload: true
});
});
So it will be like this:
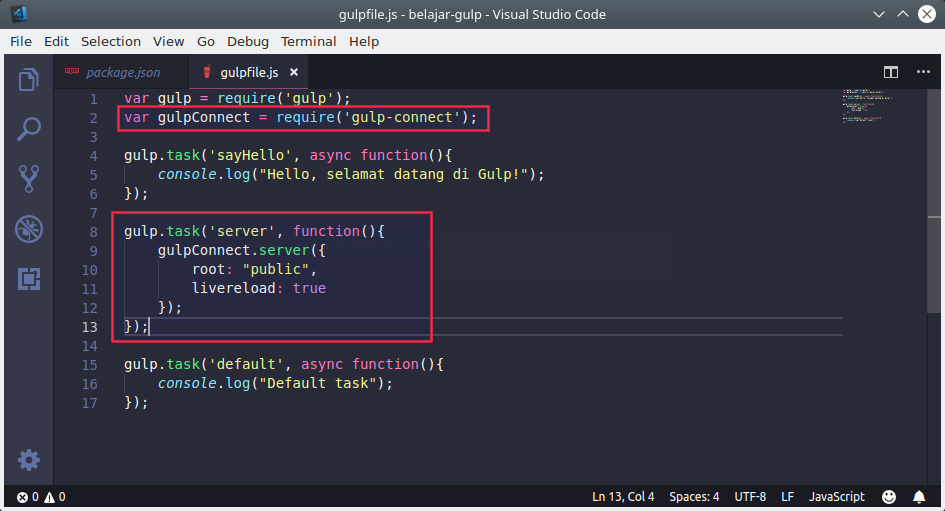
In the task code above, we determine the root directory is
public. We haven't created this directory yet.
Please create a new folder or directory named
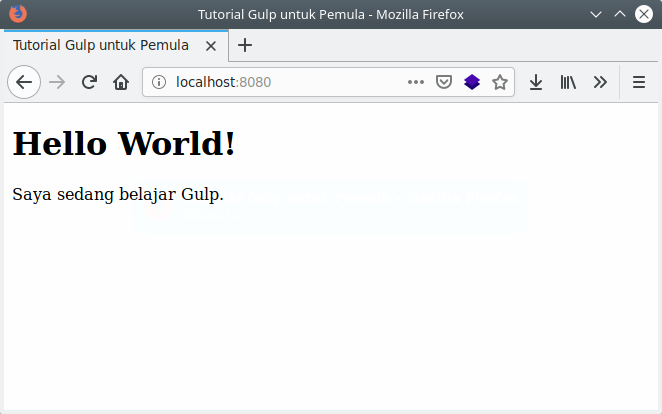
public, then inside it make another HTML file named index.htmlwith the contents as follows:<!DOCTYPE html>
<html lang="en">
<head>
<meta charset="UTF-8">
<meta name="viewport" content="width=device-width, initial-scale=1.0">
<meta http-equiv="X-UA-Compatible" content="ie=edge">
<title>Tutorial Gulp untuk Pemula</title>
</head>
<body>
<h1>Hello World!</h1>
<p>Saya sedang belajar Gulp.</p>
</body>
</html>
So it will be like this:

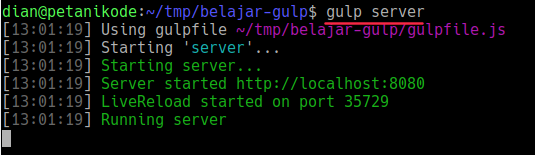
Well! now let's try running the task.
Type the command:
gulp server
Then it will come out like this.
Now try opening the web browser, then point to the address http: // localhost: 8080 . Then the result:
Minify File with Gulp
Minify is proese to optimize files to be smaller. The smaller the file, the faster the download speed will be.
This will make our website faster.
To do Minify, we need several modules:
gulp-htmlminto minify HTML files;gulp-minify-cssto minify CSS files;gulp-uglifyto minify Javascript fule;gulp-concatto combine multiple javascript files.
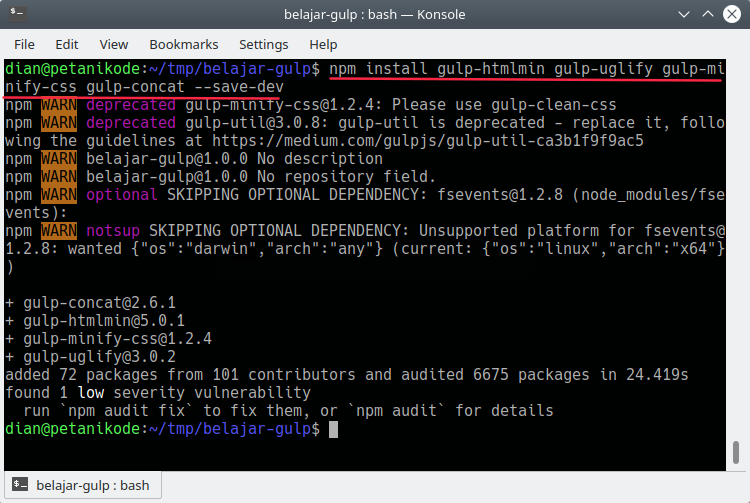
Let's install everything. Please type the following command:
npm install gulp-htmlmin gulp-uglify gulp-minify-css gulp-concat --save-dev
Wait until the process is complete.
After that, create new folders and files with a structure like this:
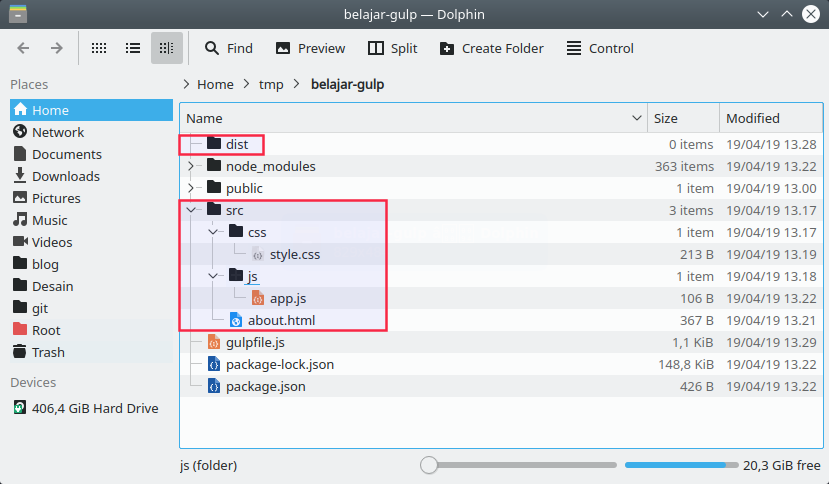

dist/the contents are empty, this directory will be the destination directory;-
src/contains HTML, CSS, and JS files;-
css/contains CSS files;
style.css
-
js/contains JS files;-
app.js
-
about.html
The third file (
about.html, style.css, and app.js) we Minify. Then the results will be saved in a folder dist.
Please fill in the three files with the code below.
Contents
src/about.html:<!DOCTYPE html>
<html lang="en">
<head>
<meta charset="UTF-8">
<meta name="viewport" content="width=device-width, initial-scale=1.0">
<meta http-equiv="X-UA-Compatible" content="ie=edge">
<title>About Us</title>
</head>
<body>
<h1>About Us</h1>
<p>Ini adalah halaman about tentang belajar Gulp.</p>
<div id="message"></div>
</body>
</html>
Contents
src/css/style.css:h1 {
font-family: -apple-system, BlinkMacSystemFont, 'Segoe UI', Roboto, Oxygen, Ubuntu, Cantarell, 'Open Sans', 'Helvetica Neue', sans-serif;
}
p {
font-family: Georgia, 'Times New Roman', Times, serif;
color: darkslategray;
}
body {
background-color: bisque;
}
Contents
src/js/app.js:var message = document.getElementById("message");
message.innerHTML = "Terimakasih sudah bealajar Gulp!";
After that, we will create a task to minify.
Reopen the file
gulpfile.jsthen add the following task.// import modul
var gulpMinifyCss = require('gulp-minify-css');
var gulpConcat = require('gulp-concat');
var gulpUglify = require('gulp-uglify');
var gulpHtmlmin = require('gulp-htmlmin');
// task untuk minify
gulp.task('minify-css', async function () {
gulp.src('./src/css/*.css')
.pipe(gulpMinifyCss({
compatibility: 'ie8'
}))
.pipe(gulp.dest('./dist/'));
});
gulp.task('minify-js', async function () {
gulp
.src([
'./src/js/*.js'
])
.pipe(gulpConcat('bundle.js'))
.pipe(gulpUglify())
.pipe(gulp.dest('dist'));
});
gulp.task('minify-html', async function () {
gulp.src('src/*.html')
.pipe(gulpHtmlmin({
collapseWhitespace: true
}))
.pipe(gulp.dest('dist'))
});
In the above task, we use a lot of methods
pipe(). This method serves to create channels and filters from source to destination.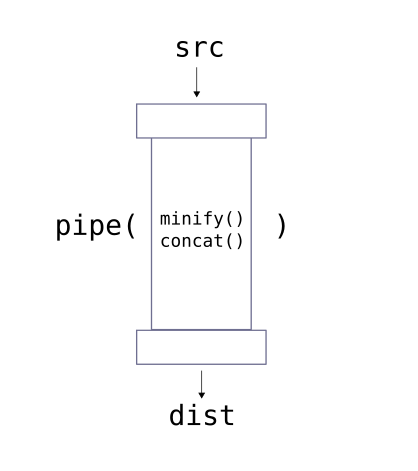
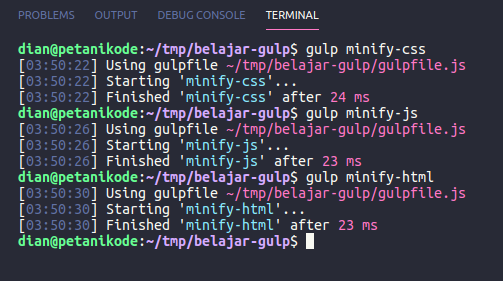
Now let's try minify. Type the following command:
gulp minify-css
gulp minify-js
gulp minify-html
Then it will come out like this:
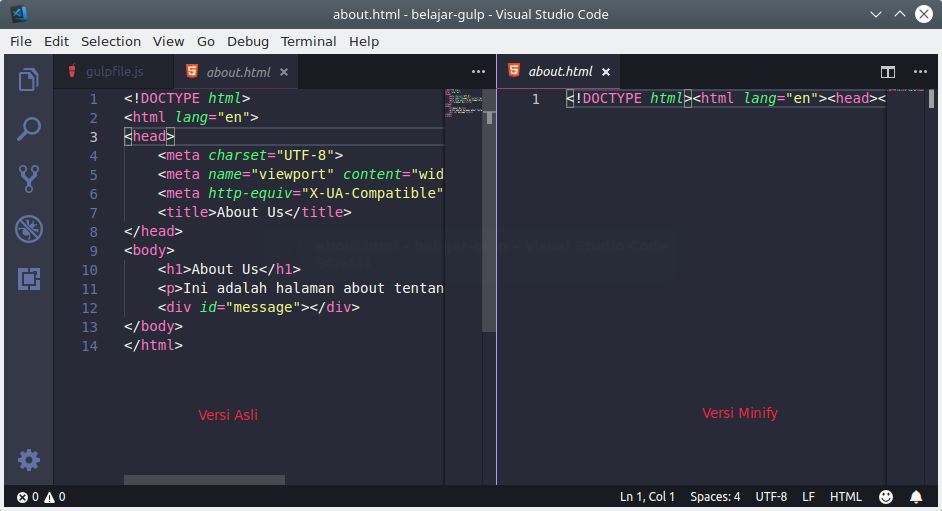
Now try checking the results.
Place files that have been minified in the original.
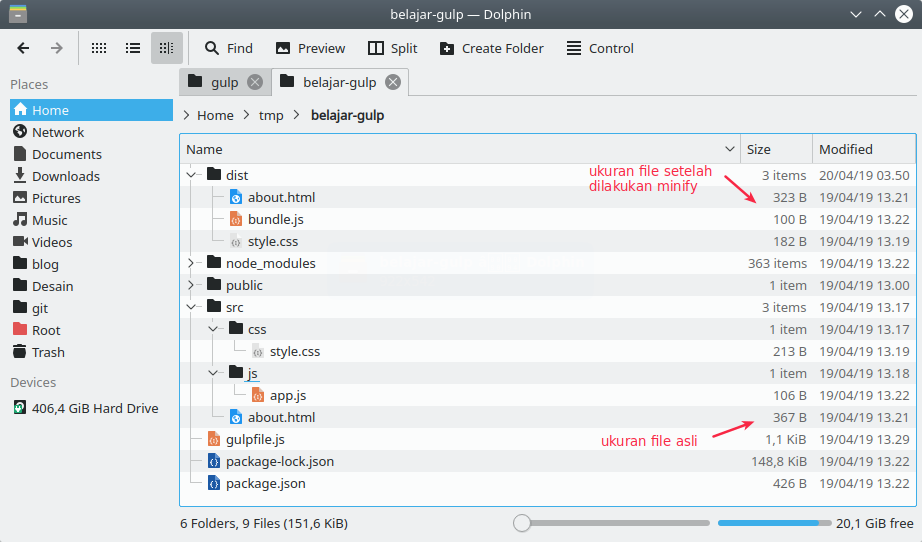
Let's compare the contents.
Using Gulp Watch
When we do minify, we have to type this command.
gulp minify-css
gulp minify-js
gulp minify-html
Next, when there are changes to the file ...
... then we have to type the command again.
In order not to type repeatedly, we can use Gulp Watch.
The task of Gulp Watch is to monitor changes to the file, then when there is a change Gulp will run a task automatically.
Please add the following task to the file
gulpfile.jsto make a Watch.gulp.task('watch', async function () {
gulp.watch('./src/js/*.js', gulp.series('minify-js'));
gulp.watch('./src/css/*.css', gulp.series('minify-css'));
gulp.watch('./src/*.html', gulp.series('minify-html'));
});
That is, Gulp will monitor the files in the folder
src/, then will run certain tasks .
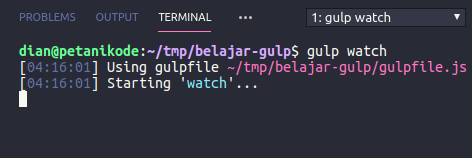
Let's try ...
Please type the following command:
gulp watch
Then it will come out like this:
Now try changing something, for example we will change the CSS file. Then it will come out like this:
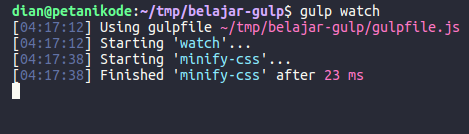
This means that Gulp runs tasks automatically when we make changes.
Using Live Reload
Almost the same as Gulp Watch, Live Reload functions to reload the web browser when there is a change.
Reload Live feature can be used to call a method
reload()in pipe()which desired..pipe(gulpConnect.reload())
For example, I want to enable live reload when I change CSS. So in the task
minify-cssI will give it like this:gulp.task('minify-css', async function () {
gulp.src('./src/css/*.css')
.pipe(gulpMinifyCss({
compatibility: 'ie8'
}))
.pipe(gulp.dest('./dist/'))
.pipe(gulpConnect.reload());
});
Okay now try changing the
rootdirectory on the task serverto dist.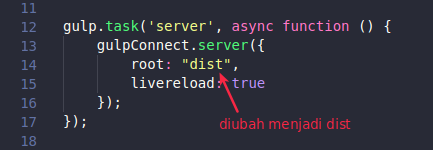
Then change the default task to something like this:
gulp.task('default', gulp.series('watch', 'server'));
This means that we will determine
watchand serveras the default task.
Then on each Minify task, add
pipe()this..pipe(gulpConnect.reload())
Now the full contents of the file
gulpfile.jswill be like this:var gulp = require('gulp');
var gulpConnect = require('gulp-connect');
var gulpMinifyCss = require('gulp-minify-css');
var gulpConcat = require('gulp-concat');
var gulpUglify = require('gulp-uglify');
var gulpHtmlmin = require('gulp-htmlmin');
gulp.task('sayHello', async function () {
console.log("Hello, selamat datang di Gulp!");
});
gulp.task('server', async function () {
gulpConnect.server({
root: "dist",
livereload: true
});
});
gulp.task('minify-css', async function () {
gulp.src('./src/css/*.css')
.pipe(gulpMinifyCss({
compatibility: 'ie8'
}))
.pipe(gulp.dest('./dist/'))
.pipe(gulpConnect.reload());
});
gulp.task('minify-js', async function () {
gulp
.src([
'./src/js/*.js'
])
.pipe(gulpConcat('bundle.js'))
.pipe(gulpUglify())
.pipe(gulp.dest('dist'))
.pipe(gulpConnect.reload());
});
gulp.task('minify-html', async function () {
gulp.src('src/*.html')
.pipe(gulpHtmlmin({
collapseWhitespace: true
}))
.pipe(gulp.dest('dist'))
.pipe(gulpConnect.reload());
});
gulp.task('watch', async function () {
    gulp.watch('./src/js/*.js', gulp.series('minify-js'));
    gulp.watch('./src/css/*.css', gulp.series('minify-css'));
    gulp.watch('./src/*.html', gulp.series('minify-html'));
});
gulp.task('default', gulp.series('watch', 'server'));
Now let's try running ...
Just type
gulp.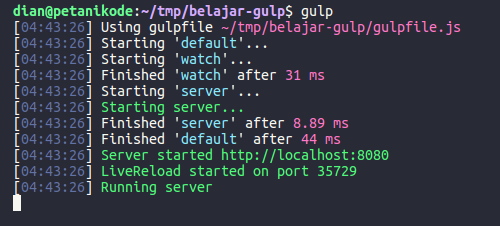
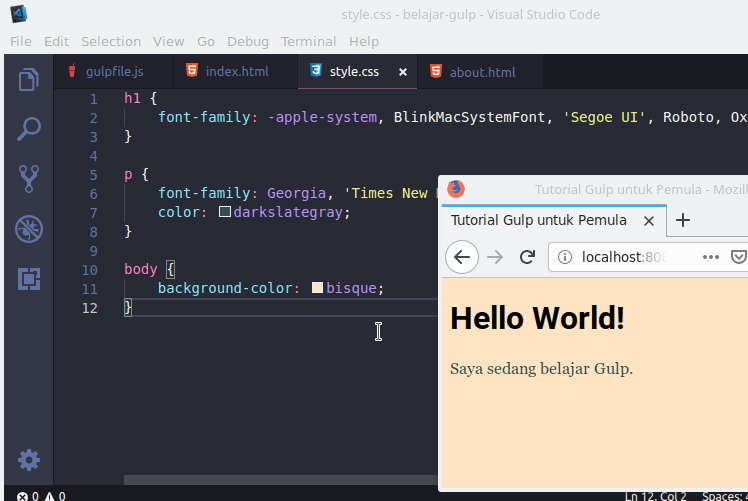
After that, try creating a new HTML file in the folder
src with the name index.htmland contents as follows:<!DOCTYPE html>
<html lang="en">
<head>
<meta charset="UTF-8">
<meta name="viewport" content="width=device-width, initial-scale=1.0">
<meta http-equiv="X-UA-Compatible" content="ie=edge">
<title>Tutorial Gulp untuk Pemula</title>
<link href="style.css" rel="stylesheet" />
</head>
<body>
<h1>Hello World!</h1>
<p>Saya sedang belajar Gulp.</p>
</body>
</html>
Then the result:
Clean and Build Project with Gulp
To build and clean the project with Gulp, we need two modules:
gulp-cleanto delete build results;- and
gulp-sequenceto run tasks sequentially (we will usegulp.series()).
We only need to install
gulp-cleanit, because it gulp-sequencecan be replaced with a function series().
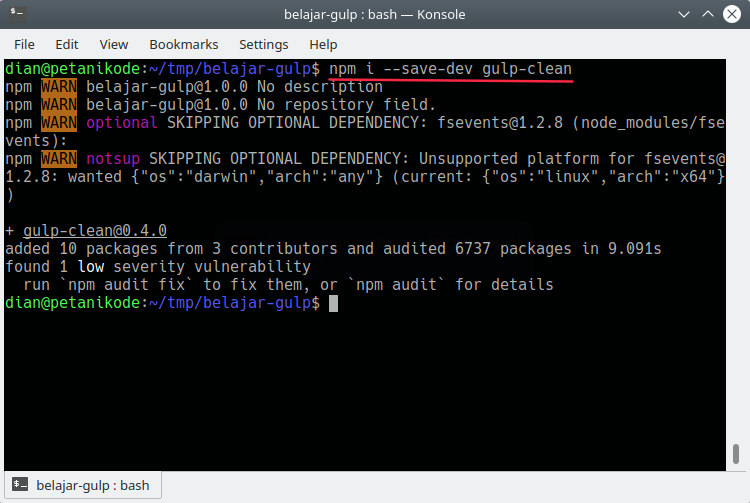
Let's install
gulp-clean, please type the following command:npm i --save-dev gulp-clean
Wait until the process is complete.
After that, add the following task inside
gulpfile.js.var clean = require('gulp-clean');
// ---
gulp.task('clean', function() {
return gulp.src('dist', {
read: false,
allowEmpty: true
}).pipe(clean());
});
gulp.task('build', gulp.series('clean', 'minify-css', 'minify-js', 'minify-html'));
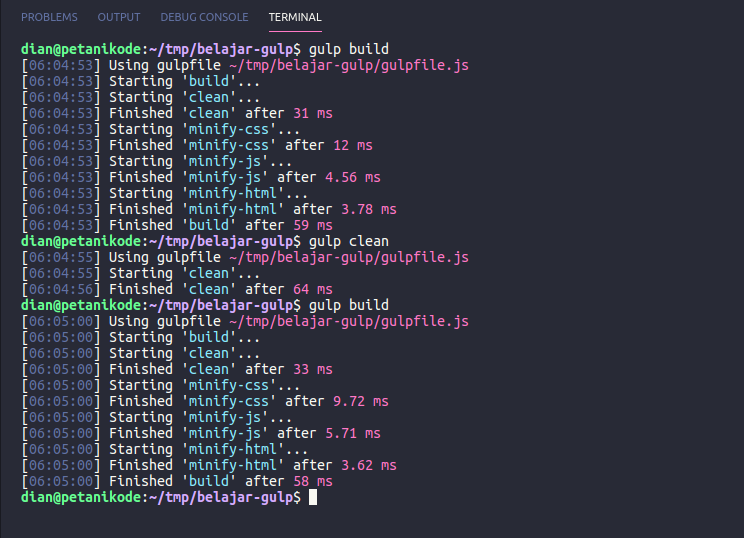
After that, try to execute the taks with the command:
gulp build
Then the result:

0 Komentar untuk "Gulp Tutorial for Beginners, One of the Required Tools for Web Developers"
Please comment according to the article