
The web is not only used to display information ...
... The web is also used to retrieve information or data from visitors.
One way to retrieve information from visitors is to use theform .
Forms on the web can be equated with formal in the real world.
The form can be filled in, then processed with a certain program.
In this tutorial, we will learn how to create forms in HTML.
Just make it ...
Not until processing the data.
Because that is included in the topic of another discussion.
OK…
Let's start.
How to Create Forms in HTML
We can create a form in HTML with tags
<form>.
This tag has several attributes that must be given, such as:
actionto determine what will be done when the data is sent;methoddata delivery method.
Example:
<form action="prosess.php" method="GET">
<!-- form field di sini -->
</form>
For attributes
action, we can fill it with the URL address of the endpoint that will process the form.
Simply put, - in the example above - we will tell the file
prosess.phpto process the form data.
We will learn this later in PHP.
The HTML code above will not produce anything.
Because we haven't created the field yet.
What is Field?
Field is a segment that can be filled with data.
Example field:
<input type="text" name="info" />
Field has several attributes that must be given:
typeis a type of field.nameis the name of the field that will be the key and variable in the program.
Exercise: Create a Login Form
As an exercise, let's create a login form.
On the login form, there are several fields and elements:
- Field for inputting username or email;
- Field for password input;
- Checkbox for remember me;
- Button to login.
Here is the code:
<!DOCTYPE html>
<html>
<head>
    <title>Form Login</title>
</head>
<body>
    <form action="login.php" method="POST">
        <fieldset>
        <legend>Login</legend>
        <p>
            <label>Username:</label>
            <input type="text" name="username" placeholder="username..." />
        </p>
        <p>
            <label>Password:</label>
            <input type="password" name="password" placeholder="password..." />
        </p>
        <p>
            <label><input type="checkbox" name="remember" value="remember" /> Remember me</label>
        </p>
        <p>
            <input type="submit" name="submit" value="Login" />
        </p>
        </fieldset>
    </form>
</body>
</html>
The result:
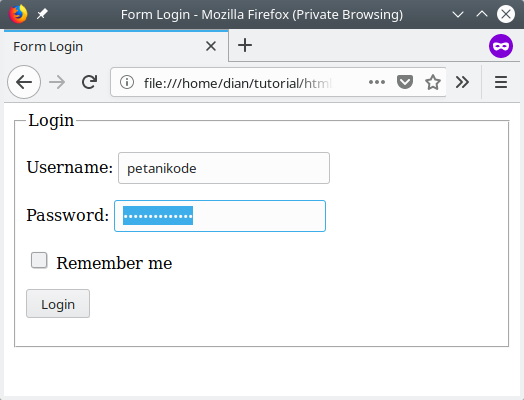
Now pay attention!
In the code above, we make four filed:
- input
usernamewith typetext; - input
passwordwith typepassword; - input
rememberwith typecheckbox; - input
submitwith typesubmit;
Then all three of these filed are wrapped into tags
<fieldset>.
Later
<fieldset>this tag will make a line.
Inside the tag
<fieldset>, we create a tag <legend> to provide text in the fieldset .
Then, pay attention to the atirbut used in each field.
- Attributes
placeholderto display placeholders ; - Attribute
valueto give the default value in the field.
Each field we wrap in a tag
<p>so that it looks neat and also we give a label with tags <label>.Exercise: Create a Contact Form
Exercise Next, we will create a contact form . This form serves to contact or contact the admin.
Please follow the following code:
<!DOCTYPE html>
<html>
<head>
    <title>Contact Us</title>
</head>
<body>
    <form action="contact.php" method="POST">
        <fieldset>
        <legend>Contact</legend>
        <p>
            <label>Name:</label>
            <input type="text" name="name" placeholder="your name..." />
        </p>
        <p>
            <label>Subject:</label>
            <input type="text" name="subject" placeholder="subject..." />
        </p>
        <p>
            <label>Email:</label>
            <input type="email" name="email" placeholder="your email..." />
        </p>
        <p>
            <input type="submit" name="submit" value="Send" />
        </p>
        </fieldset>
    </form>
</body>
</html>
The result:
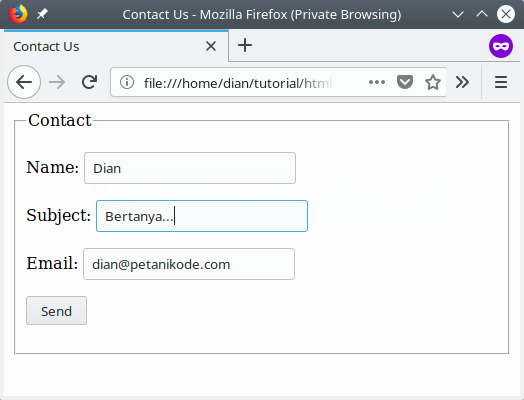
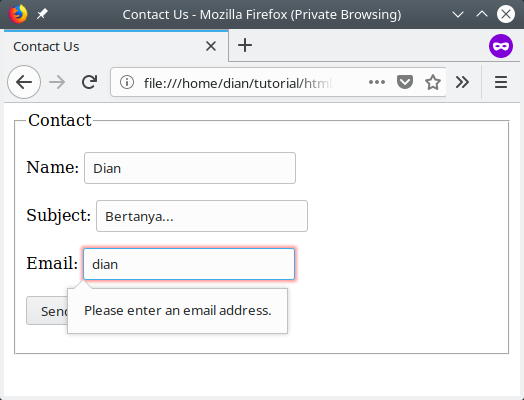
In the example above, we provide
type="email"for fields email, so that this filed must be filled with e-mail only.
Just try to fill with the others, then click Send ... then a warning message will appear.
Exercise: Create a Register Form
The more practice, the better.
Next we will try to create a registration form.
This form contains fields for:
- Input full name;
- Input username;
- Email input;
- Input password;
- Sex input;
- Religious Input;
- Biographical Input.
- etc.
Let's make ...
<!DOCTYPE html>
<html>
<head>
    <title>Registrasi</title>
</head>
<body>
    <form action="contact.php" method="POST">
        <fieldset>
        <legend>Registrasi</legend>
        <p>
            <label>Nama:</label>
            <input type="text" name="nama" placeholder="Nama lengkap..." />
        </p>
        <p>
            <label>Username:</label>
            <input type="text" name="username" placeholder="Username..." />
        </p>
        <p>
            <label>Email:</label>
            <input type="email" name="email" placeholder="Your email..." />
        </p>
        <p>
            <label>Password:</label>
            <input type="password" name="password" placeholder="Passowrd..." />
        </p>
        <p>
            <label>Jenis kelamin:</label>
            <label><input type="radio" name="jenis_kelamin" value="laki-laki" /> Laki-laki</label>
            <label><input type="radio" name="jenis_kelamin" value="perempuan" /> Perempuan</label>
        </p>
        <p>
            <label>Agama:</label>
            <select name="agama">
                <option value="islam">Islam</option>
                <option value="kristen">Kristen</option>
                <option value="hindu">Hindu</option>
                <option value="budha">Budha</option>
            </select>
        </p>
        <p>
            <label>Biografi:</label>
            <textarea name="biografi"></textarea>
        </p>
        <p>
            <input type="submit" name="submit" value="Daftar" />
        </p>
        </fieldset>
    </form>
</body>
</html>
The result:
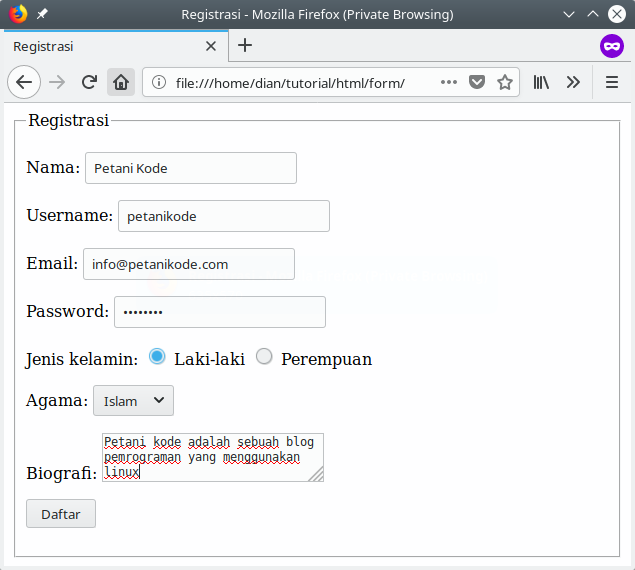
What are the new fields on the form?
- Field
radio; - Field
<select><option>; - Field
<textearea>.
What's the difference
radiowith checkbox?
If we want visitors to choose one, then we use it
radio.
But if we want visitors to choose more than one, then we use it
checkbox.
Then for
<select></option>, it's the same as radio. Only he has a different shape.
Then to enter long text, we use tags
<textarea>.Exercise: Create an Advanced Form
The fields above are the types of fields that are often used in creating forms.
There is still another type of field that we have not tried, such as
meter, color, url, number, date, datetime, etc.
Let's try a few:
<!DOCTYPE html>
<html>
<head>
    <title>Form HTML</title>
</head>
<body>
    <form action="contact.php" method="POST">
        <fieldset>
        <legend>Form</legend>
        <p>
            <label>Alamat Web:</label>
            <input type="url" name="name" placeholder="Masukan URL Web..." />
        </p>
        <p>
            <label>Tanggal Lahir:</label>
            <input type="date" name="tanggal" />
        </p>
        <p>
            <label>Umur:</label>
            <input type="number" min="10" max="90" name="umur" />
        </p>
        <p>
            <input type="submit" name="submit" value="Send" />
        </p>
        </fieldset>
    </form>
</body>
</html>
The result:

If your browser does not appear in the calendar as above, try using the latest browser version.
What is next?
What we learned in this tutorial are basic tags and fields - and often used - in form creation.
There are still many types of fields that we haven't tried yet. Such as:
meter, color, time, etc.
Therefore, please practice continuously ...
Reference: https://www.petanikode.com/html-form/


0 Komentar untuk "Learning HTML: How to Create Forms in HTML"
Please comment according to the article