
Well! which have not been…
Discussion of databases and models .
Okay, the title is enough clickbait : "How to make a CRUD feature in the right code !"
Why did I say that?
Because, some of the Codeigniter tutorials that I have followed do not teach best practices in coding CIs.
Not that they are wrong ...
... and claim the method in this tutorial is the most correct .
All ways and solutions, right.
It's just that, if we write code carelessly, the result can be a loss.
I once worked on a project using Codeigniter, then the codes I wrote were very messy and dirty.
The result:
Project failed, because I don't want to develop it anymore.
Complicated!
I prefer to re-coding from the start rather than developing the code.
That's how it feels to write bad and dirty code.
However, from the results of the repetition. I learned many things.
Like, how should I receive data from the form. Is it directly saved to the database, or is it validated first.
It turns out that the truth is:
Data must be validated first.
If it is not validated, it could be a lot of bugs and be vulnerable to XSS attacks.
Add more work ... 
Learning from experience, I don't want you to have the same fate as me who failed to complete the project.
So I made this tutorial ...
If there is a better solution, please suggest it in the comments!
Okay, we go into the tutorial.
In this tutorial, we will do many things. Starting from creating databases, preparing libraries, making models, to creating CRUDs.
CRUD (Create, Read, Update Delete) is a basic feature that we must make when working with databases.
Here is a list of jobs ...
TODO:
Let's start working ...
Creating a Database for CodeIgniter
Please open PHPMyadmin, then create a new database with the name
tokobuah.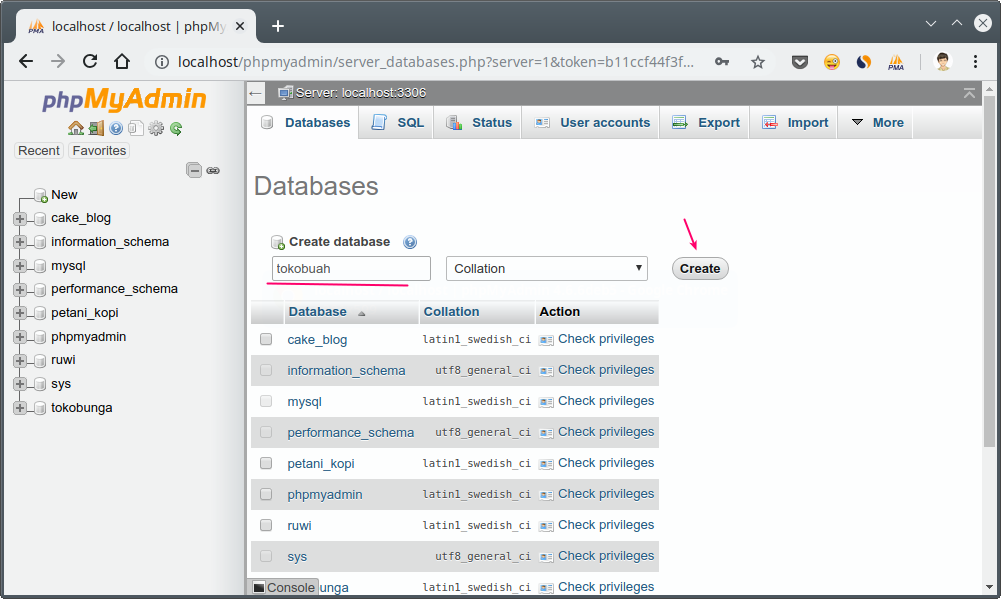
After that, create a table
productswith 5columns. This table will then store product data.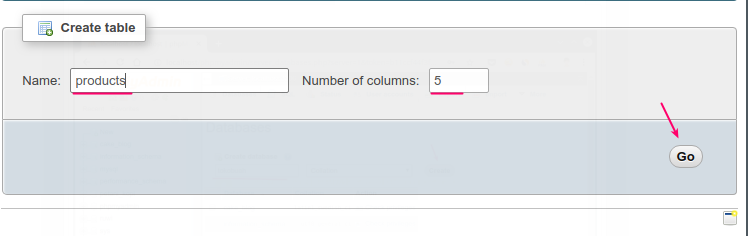
Required columns:
product_id(Primary Key) has a string type with length64;namestring type length255.pricetype integer.imagestring type length255.descriptiontype TEXT.
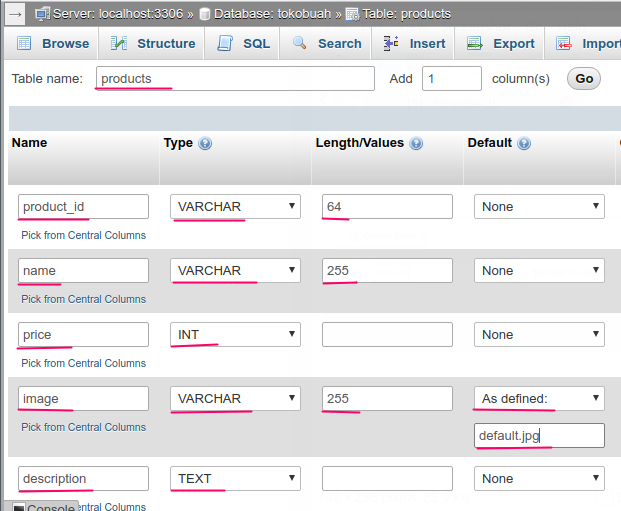
... and do not forget to make the column
product_idas the primary key .
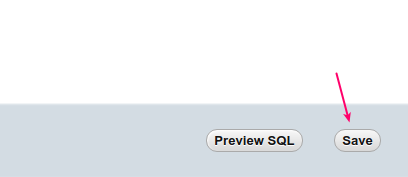
Finally, click Save to save.
So we now have a table
productswith a structure like this: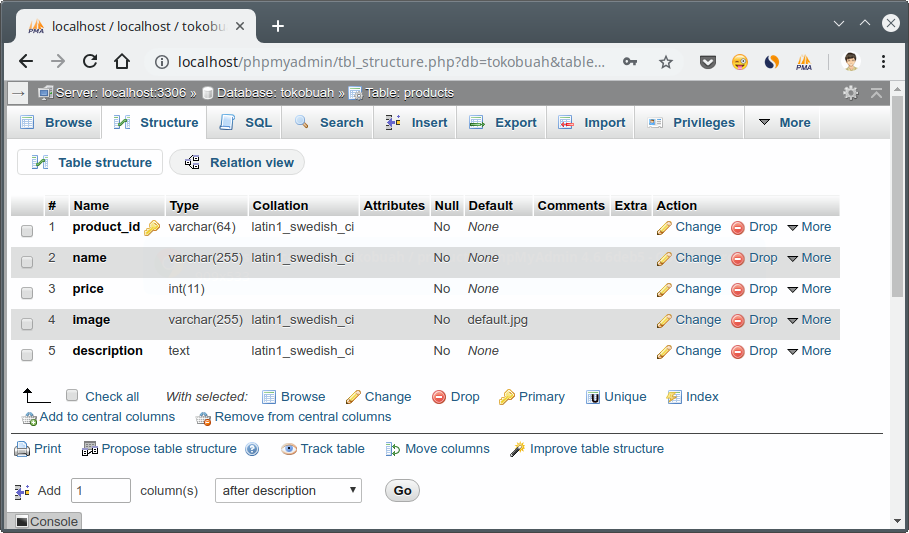
The SQL code:
CREATE TABLE `products` (
  `product_id` varchar(64) NOT NULL,
  `name` varchar(255) NOT NULL,
  `price` int(11) NOT NULL,
  `image` varchar(255) NOT NULL DEFAULT 'default.jpg',
  `description` text NOT NULL
) ENGINE=InnoDB DEFAULT CHARSET=latin1;
One job has finished ...
TODO:
Next we will configure Codeigniter to connect to the database.
Codeigniter configuration
Please open 
config/database.php, then fill in like this:$db['default'] = array(
'dsn' => '',
'hostname' => 'localhost',
'username' => 'dian',
'password' => 'kopi',
'database' => 'tokobuah',
'dbdriver' => 'mysqli',
'dbprefix' => '',
'pconnect' => FALSE,
'db_debug' => (ENVIRONMENT !== 'production'),
'cache_on' => FALSE,
'cachedir' => '',
'char_set' => 'utf8',
'dbcollat' => 'utf8_general_ci',
'swap_pre' => '',
'encrypt' => FALSE,
'compress' => FALSE,
'stricton' => FALSE,
'failover' => array(),
'save_queries' => TRUE
);
Pay attention to the following items:
'hostname' => 'localhost',
'username' => 'dian',
'password' => 'kopi',
'database' => 'tokobuah',
Please change according to the configuration of the mysql server on your computer.
On my computer, the MySQL username is the
dian password kopi.
If you use XAMPP, the password is usually non-existent and the user used is
root.
Use this for XAMPP:
'hostname' => 'localhost',
'username' => 'root',
'password' => '',
'database' => 'tokobuah',
Next, please open
config/autoload.php.
Then find
$autoload['libraries']and add database and sessionthere.$autoload['libraries'] = array('database', 'session');
This means, we will load the library
databaseand sessionautomatically.
What is the function?
- The library
databasewill provide functions for database operations. We need this, because we will use the database in the application; - The library
sessionprovides functions to access variables$_SESSION. We need this to display the flash message and make a login.
Thus the configuration is complete ...
TODO:
If there is something we want to configure again or want to add more libraries, later we can change the configuration.
For now, we just need a database configuration and autoload library .
Next, we will start writing code for the model.
Creating a Model for Tables
The model is a class or code related to data.
In the model, we will make data modeling from the database. So that we will more easily access it.
Usually one table, one model is made.
Please create a new file in the directory 
application/model/with the name Product_model.php.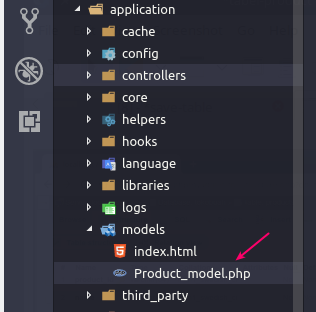
Note, the name must begin with a capital letter.
In the example above, it
Pis capital letters.
I deliberately made this suffix to make it easier to distinguish the Controller class from the Model class .
Later we will also create a named Controller class
Products.php, so we should use the suffix _model in the Modelclass .
After creating the file, what else?
Next we will start writing code for
Product_model.php.
Please type the following code ...
(type yes! don't copy it, so you can experience coding, not copas experience  )
)
<?php defined('BASEPATH') OR exit('No direct script access allowed');

class Product_model extends CI_Model
{
    private $_table = "products";

    public $product_id;
    public $name;
    public $price;
    public $image = "default.jpg";
    public $description;

    public function rules()
    {
        return [
            ['field' => 'name',
            'label' => 'Name',
            'rules' => 'required'],

            ['field' => 'price',
            'label' => 'Price',
            'rules' => 'numeric'],

            ['field' => 'description',
            'label' => 'Description',
            'rules' => 'required']
        ];
    }

    public function getAll()
    {
        return $this->db->get($this->_table)->result();
    }

    public function getById($id)
    {
        return $this->db->get_where($this->_table, ["product_id" => $id])->row();
    }

    public function save()
    {
        $post = $this->input->post();
        $this->product_id = uniqid();
        $this->name = $post["name"];
        $this->price = $post["price"];
        $this->description = $post["description"];
        $this->db->insert($this->_table, $this);
    }

    public function update()
    {
        $post = $this->input->post();
        $this->product_id = $post["id"];
        $this->name = $post["name"];
        $this->price = $post["price"];
        $this->description = $post["description"];
        $this->db->update($this->_table, $this, array('product_id' => $post['id']));
    }

    public function delete($id)
    {
        return $this->db->delete($this->_table, array("product_id" => $id));
    }
}
Has it finished typing?
Well, it's my turn to explain:
We can't try the code above, because this is only data modeling.
Later we will use the functions or methods in this code in the Controller class .
First, please consider this section:
private $_table = "products"; //nama tabel

// nama kolom di tabel, harus sama huruf besar dan huruf kecilnya!
public $product_id;
public $name;
public $price;
public $image = "default.jpg";
public $description;
This is the property or variable that we need in the Productmodel .
On the property
$_tabelwe provide modifiers private, because this property will only be used in this class.
If you have studied OOP, you will understand.
Then on the property
$image, we immediately fill the value with "default.jpg".
This will later become the default value, actually we could not fill it up.
Because we have given the default value in the table.
Next, please note the method
rules():public function rules()
{
return [
['field' => 'name',
'label' => 'Name',
'rules' => 'required'],
['field' => 'price',
'label' => 'Price',
'rules' => 'numeric'],
['field' => 'description',
'label' => 'Description',
'rules' => 'required']
];
}
Method ini akan mengembalikan sebuah array yang berisi rules.
Rules ini nanti kita butuhkan untuk validasi input.
Pada Rules di atas, kita memberikan aturan untuk wajib mengisi (required) field
name, price, dan description.
Berikutnya, silahkan perhatikan method
get() dan getAll(). Kedua method ini akan kita gunakan untuk mengambil data dari database.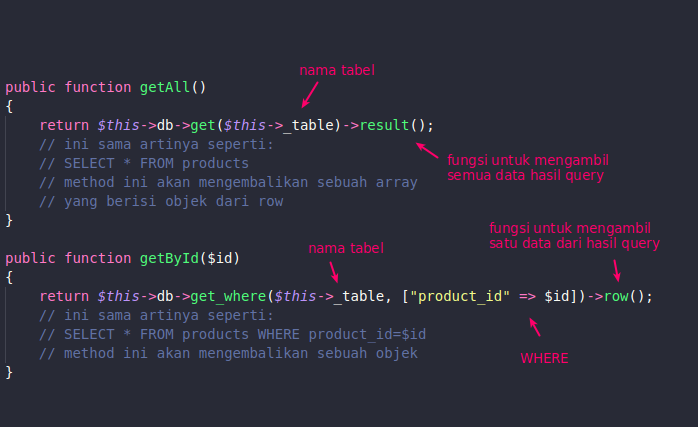
Berikutnya perhatikan method
save():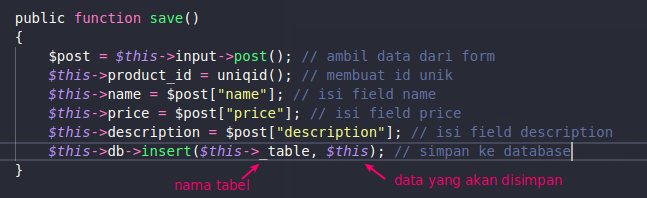
Method ini akan kita gunakan untuk menyimpan data ke tabel
product.
Kita mengambil input yang dikirim dari form menggunakan
$this->input->post().
Mengapa ini ditulis di model?
Usually people write it on the Controller . However, so that the Controller is more focused on managing the Model relationship with View, then we should write this in the Model.
Because later on the Controller , we just have to validate the input.
The next method is almost the same.
Method
update()for updating data and delete()for deleting data.
In the method
update(), we fill $this->product_id in the idobtained from form ( $post['id']). Because this is for updates.
Whereas in the method
save(), we fill it with functions uniqid(). Because we will make new.
This function will produce unique characters.


Baik, dengan demikian…
…kita sudah selesai membuat model.
TODO:
Berikutnya kita akan membuat Controller.
Membuat Controller
Seperti yang sudah kita pelajari pada tutorial sebelumnya,Controller adalah bagian dari CI yang bertugas untuk menangani HTTP request dan menghubungan Model dengan View.
Pada Controller, kita akan memanggil method-method yang ada di dalam model untuk mendapatkan data.
Setelah itu data tersebut di-render ke dalam view dengan me-load-nya.
Untuk lebih jelasnya…
Mari kita mulai coding.
Silahkan buat file baru di dalam folder
application/controllers/admin/ dengan nama Products.php.
Kemudian isi file
Products.php dengan kode berikut:<?php
defined('BASEPATH') OR exit('No direct script access allowed');
class Products extends CI_Controller
{
public function __construct()
{
    parent::__construct();
    $this->load->model("product_model");
    $this->load->library('form_validation');
}
public function index()
{
    $data["products"] = $this->product_model->getAll();
    $this->load->view("admin/product/list", $data);
}
public function add()
{
$product = $this->product_model;
$validation = $this->form_validation;
$validation->set_rules($product->rules());
if ($validation->run()) {
$product->save();
$this->session->set_flashdata('success', 'Berhasil disimpan');
}
$this->load->view("admin/product/new_form");
}
public function edit($id = null)
{
if (!isset($id)) redirect('admin/products');
$product = $this->product_model;
$validation = $this->form_validation;
$validation->set_rules($product->rules());
if ($validation->run()) {
$product->update();
$this->session->set_flashdata('success', 'Berhasil disimpan');
}
$data["product"] = $product->getById($id);
if (!$data["product"]) show_404();
$this->load->view("admin/product/edit_form", $data);
}
public function delete($id=null)
{
    if (!isset($id)) show_404();

    if ($this->product_model->delete($id)) {
        redirect(site_url('admin/products'));
    }
}
}
Sudah selesai?
Sekarang mari kita perhatikan penjelasannya…
Ada lima method dalam class tersebut:
1. Method __construct()
Method
__construct() merupakan sebuah konstruktor. Method ini yang akan dieksekusi pertama kali saat Controllerdiakses.
Pada method ini, kita melakukan load model (
porduct_model) dan library (form_validation).public function __construct()
{
parent::__construct();
$this->load->model("product_model");
$this->load->library('form_validation');
}
form_validationWe will use the library to validate the input on the method add()and edit().
Why should it be validated?
Because the user can input data arbitrarily. For example, deliberately filling in with blank data, malicious scripts such as: XSS attacks , etc.
Bottom line:
Before saving data to a database, make sure the data is correct.
2. Method index()
In this method, we will retrieve data from the model by calling the method
product_model->getAll().
Then we render it into view
admin/product/list.public function index()
{
$data["products"] = $this->product_model->getAll();
$this->load->view("admin/product/list", $data);
}
View
admin/product/listdoes not exist. Nati we will make it.
3. Method add()
This method is responsible for displaying the add form and saving data to the database. Of course by calling the method
save()in the model.
However, before calling the method
save(), we do the validation first by executing the method run()on the object $validation.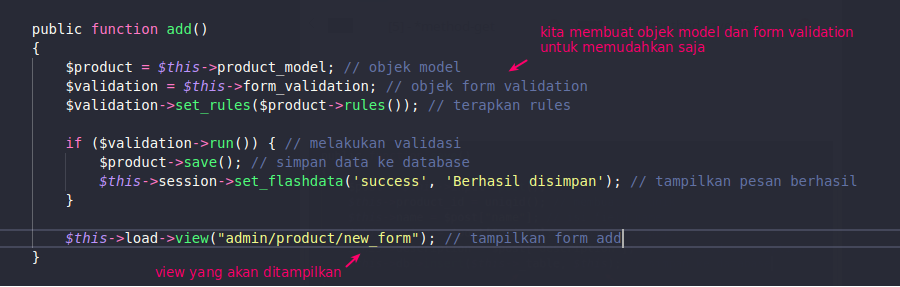
If successful, the message
"Berhasil disimpan"will be displayed.
Finally, we will display a view
product/new_form. This view contains a form to add data.
This view is also missing.
Later we will make it.
4. Method edit()
Almost the same as the method
add(), the method is edit()also responsible for displaying forms and storing data.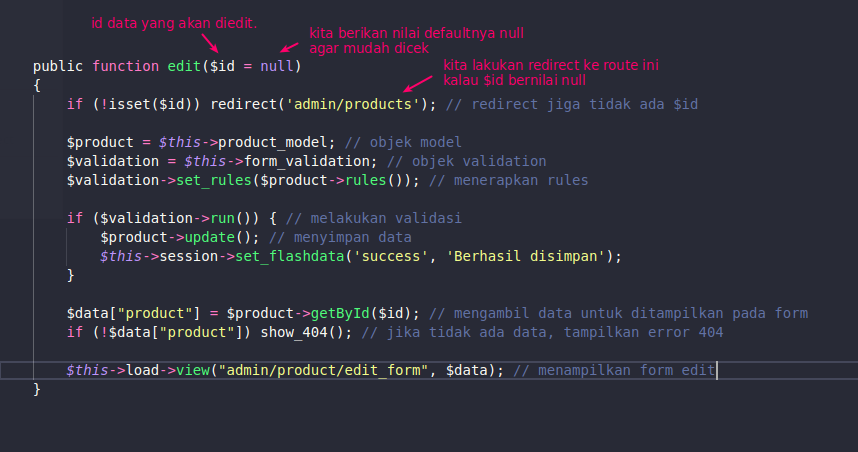
Maybe you will ask ...
$idWhere will the value be obtained?
We
$idwill get the value from the parameters or arguments in the URL.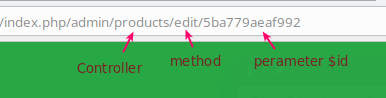
5. Method delete()
The method
delete()functions to handle data deletion.
Prinsipnya hampir sama seperti method
edit(), method delete() juga membutuhkan $id untuk menentukan data mana yang akan dihapus.public function delete($id=null)
{
if (!isset($id)) show_404();
if ($this->product_model->delete($id)) {
redirect(site_url('admin/products'));
}
}
Apabila data berhasil dihapus, maka kita langsung alihkan (
redirect()) menuju ke halaman admin/products/.
Dengan demikian…
Kita sudah selesai membuat Controller. 
TODO:
Tugas kita masih belum selesai dan aplikasi masih belum dapat dicoba, karena kita belum membuat view-nya.
Membuat View
View merupakan bagian yang bertugas mengurus tampilan.
Ada tiga macam view yang harus kita buat dalam aplikasi ini:
list.phpuntuk menampilkan data;new_form.phpuntuk menampilkan form tambah data;- dan
edit_form.phpuntuk menampilkan form edit data.
Mari kita buat semuanya.
Tapi sebelum itu, silahkan buat folder baru pada direktori
views/admin dengan nama product.
Setelah itu, kita akan membuat ketiga view di dalam folder
views/admin/product/.1. View List Data
Buatlah file baru dengan nama
list.php di dalam folder views/admin/product/.
Setelah itu, isi dengan kode berikut:
<!DOCTYPE html>
<html lang="en">

<head>
 <?php $this->load->view("admin/_partials/head.php") ?>
</head>

<body id="page-top">

 <?php $this->load->view("admin/_partials/navbar.php") ?>
 <div id="wrapper">

  <?php $this->load->view("admin/_partials/sidebar.php") ?>

  <div id="content-wrapper">

   <div class="container-fluid">

    <?php $this->load->view("admin/_partials/breadcrumb.php") ?>

    <!-- DataTables -->
    <div class="card mb-3">
     <div class="card-header">
      <a href="<?php echo site_url('admin/products/add') ?>"><i class="fas fa-plus"></i> Add New</a>
     </div>
     <div class="card-body">

      <div class="table-responsive">
       <table class="table table-hover" id="dataTable" width="100%" cellspacing="0">
        <thead>
         <tr>
          <th>Name</th>
          <th>Price</th>
          <th>Photo</th>
          <th>Description</th>
          <th>Action</th>
         </tr>
        </thead>
        <tbody>
         <?php foreach ($products as $product): ?>
         <tr>
          <td width="150">
           <?php echo $product->name ?>
          </td>
          <td>
           <?php echo $product->price ?>
          </td>
          <td>
           <img src="<?php echo base_url('upload/product/'.$product->image) ?>" width="64" />
          </td>
          <td class="small">
           <?php echo substr($product->description, 0, 120) ?>...</td>
          <td width="250">
           <a href="<?php echo site_url('admin/products/edit/'.$product->product_id) ?>"
            class="btn btn-small"><i class="fas fa-edit"></i> Edit</a>
           <a onclick="deleteConfirm('<?php echo site_url('admin/products/delete/'.$product->product_id) ?>')"
            href="#!" class="btn btn-small text-danger"><i class="fas fa-trash"></i> Hapus</a>
          </td>
         </tr>
         <?php endforeach; ?>

        </tbody>
       </table>
      </div>
     </div>
    </div>

   </div>
   <!-- /.container-fluid -->

   <!-- Sticky Footer -->
   <?php $this->load->view("admin/_partials/footer.php") ?>

  </div>
  <!-- /.content-wrapper -->

 </div>
 <!-- /#wrapper -->


 <?php $this->load->view("admin/_partials/scrolltop.php") ?>
 <?php $this->load->view("admin/_partials/modal.php") ?>

 <?php $this->load->view("admin/_partials/js.php") ?>

</body>

</html>
View
porduct/list.php bertugas untuk menampilkan data pada halaman admin.
Datanya didapat dari mana?
Datanya kita dapat dari Controller, coba saja perhatikan method
index() pada controller Product.php.public function index()
{
$data["products"] = $this->product_model->getAll(); // ambil data dari model
$this->load->view("admin/product/list", $data); // kirim data ke view
}
2. Membuat Form Add
View berikutnya yang harus kita buat adalah
new_form.php.
Silahkan buat file baru di dalam folder
view/admin/product/dengan nama new_form.php.
Setelah itu, isi dengan kode berikut:
<!DOCTYPE html>
<html lang="en">

<head>
 <?php $this->load->view("admin/_partials/head.php") ?>
</head>

<body id="page-top">

 <?php $this->load->view("admin/_partials/navbar.php") ?>
 <div id="wrapper">

  <?php $this->load->view("admin/_partials/sidebar.php") ?>

  <div id="content-wrapper">

   <div class="container-fluid">

    <?php $this->load->view("admin/_partials/breadcrumb.php") ?>

    <?php if ($this->session->flashdata('success')): ?>
    <div class="alert alert-success" role="alert">
     <?php echo $this->session->flashdata('success'); ?>
    </div>
    <?php endif; ?>

    <div class="card mb-3">
     <div class="card-header">
      <a href="<?php echo site_url('admin/products/') ?>"><i class="fas fa-arrow-left"></i> Back</a>
     </div>
     <div class="card-body">

      <form action="<?php base_url('admin/product/add') ?>" method="post" enctype="multipart/form-data" >
       <div class="form-group">
        <label for="name">Name*</label>
        <input class="form-control <?php echo form_error('name') ? 'is-invalid':'' ?>"
         type="text" name="name" placeholder="Product name" />
        <div class="invalid-feedback">
         <?php echo form_error('name') ?>
        </div>
       </div>

       <div class="form-group">
        <label for="price">Price*</label>
        <input class="form-control <?php echo form_error('price') ? 'is-invalid':'' ?>"
         type="number" name="price" min="0" placeholder="Product price" />
        <div class="invalid-feedback">
         <?php echo form_error('price') ?>
        </div>
       </div>


       <div class="form-group">
        <label for="name">Photo</label>
        <input class="form-control-file <?php echo form_error('price') ? 'is-invalid':'' ?>"
         type="file" name="image" />
        <div class="invalid-feedback">
         <?php echo form_error('image') ?>
        </div>
       </div>

       <div class="form-group">
        <label for="name">Description*</label>
        <textarea class="form-control <?php echo form_error('description') ? 'is-invalid':'' ?>"
         name="description" placeholder="Product description..."></textarea>
        <div class="invalid-feedback">
         <?php echo form_error('description') ?>
        </div>
       </div>

       <input class="btn btn-success" type="submit" name="btn" value="Save" />
      </form>

     </div>

     <div class="card-footer small text-muted">
      * required fields
     </div>


    </div>
    <!-- /.container-fluid -->

    <!-- Sticky Footer -->
    <?php $this->load->view("admin/_partials/footer.php") ?>

   </div>
   <!-- /.content-wrapper -->

  </div>
  <!-- /#wrapper -->


  <?php $this->load->view("admin/_partials/scrolltop.php") ?>

  <?php $this->load->view("admin/_partials/js.php") ?>

</body>

</html>
View
new_form.phpto display the input form for creating new data.
This form will send data to:
/admin/products/add (controller products, add method).
Pay attention to the form.
<form action="<?php base_url('admin/product/add') ?>" method="post" enctype="multipart/form-data" >
...
</form>
On that form, we use
enctype="multipart/form-data". We will use this later to upload files.
We haven't created the upload feature yet.
3. Create an Edit Form
The last view we have to make is
edit_form.php. Fill in the code almost the same as new_form.php.
The difference is,
edit_form.phpwe display the values for each field.
Please create a new file in the folder
views/admin/product/with the name edit_form.php.
After that, fill in the following code:
<!DOCTYPE html>
<html lang="en">

<head>
 <?php $this->load->view("admin/_partials/head.php") ?>
</head>

<body id="page-top">

 <?php $this->load->view("admin/_partials/navbar.php") ?>
 <div id="wrapper">

  <?php $this->load->view("admin/_partials/sidebar.php") ?>

  <div id="content-wrapper">

   <div class="container-fluid">

    <?php $this->load->view("admin/_partials/breadcrumb.php") ?>

    <?php if ($this->session->flashdata('success')): ?>
    <div class="alert alert-success" role="alert">
     <?php echo $this->session->flashdata('success'); ?>
    </div>
    <?php endif; ?>

    <!-- Card  -->
    <div class="card mb-3">
     <div class="card-header">

      <a href="<?php echo site_url('admin/products/') ?>"><i class="fas fa-arrow-left"></i>
       Back</a>
     </div>
     <div class="card-body">

      <form action="<?php base_url('admin/product/edit') ?>" method="post" enctype="multipart/form-data">

       <input type="hidden" name="id" value="<?php echo $product->product_id?>" />

       <div class="form-group">
        <label for="name">Name*</label>
        <input class="form-control <?php echo form_error('name') ? 'is-invalid':'' ?>"
         type="text" name="name" placeholder="Product name" value="<?php echo $product->name ?>" />
        <div class="invalid-feedback">
         <?php echo form_error('name') ?>
        </div>
       </div>

       <div class="form-group">
        <label for="price">Price</label>
        <input class="form-control <?php echo form_error('price') ? 'is-invalid':'' ?>"
         type="number" name="price" min="0" placeholder="Product price" value="<?php echo $product->price ?>" />
        <div class="invalid-feedback">
         <?php echo form_error('price') ?>
        </div>
       </div>


       <div class="form-group">
        <label for="name">Photo</label>
        <input class="form-control-file <?php echo form_error('image') ? 'is-invalid':'' ?>"
         type="file" name="image" />
        <input type="hidden" name="old_image" value="<?php echo $product->image ?>" />
        <div class="invalid-feedback">
         <?php echo form_error('image') ?>
        </div>
       </div>

       <div class="form-group">
        <label for="name">Description*</label>
        <textarea class="form-control <?php echo form_error('description') ? 'is-invalid':'' ?>"
         name="description" placeholder="Product description..."><?php echo $product->description ?></textarea>
        <div class="invalid-feedback">
         <?php echo form_error('description') ?>
        </div>
       </div>

       <input class="btn btn-success" type="submit" name="btn" value="Save" />
      </form>

     </div>

     <div class="card-footer small text-muted">
      * required fields
     </div>


    </div>
    <!-- /.container-fluid -->

    <!-- Sticky Footer -->
    <?php $this->load->view("admin/_partials/footer.php") ?>

   </div>
   <!-- /.content-wrapper -->

  </div>
  <!-- /#wrapper -->

  <?php $this->load->view("admin/_partials/scrolltop.php") ?>

  <?php $this->load->view("admin/_partials/js.php") ?>

</body>

</html>
Finally finished…
TODO:
Just the last touch.
But before that, we try the application first.
Trial Application Application
Try opening: http: //localhost/tokobuah/index.php/admin/products/
If you don't see an error, that means it works.
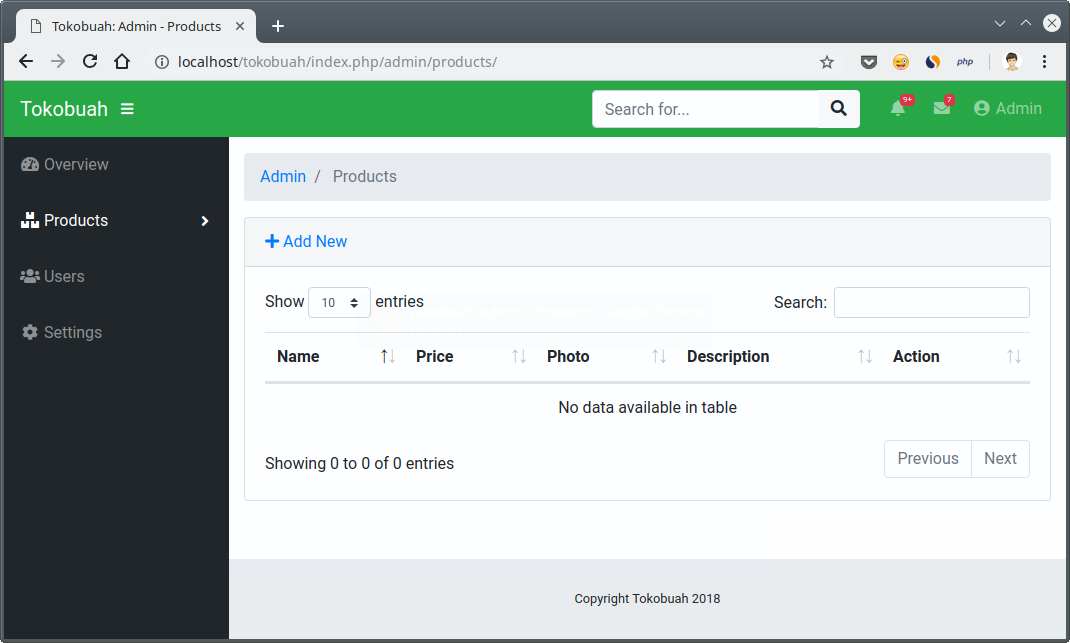
No data has been displayed on the product list page, because we haven't added any data yet.
Let's try creating new data.
Then fill with new data.
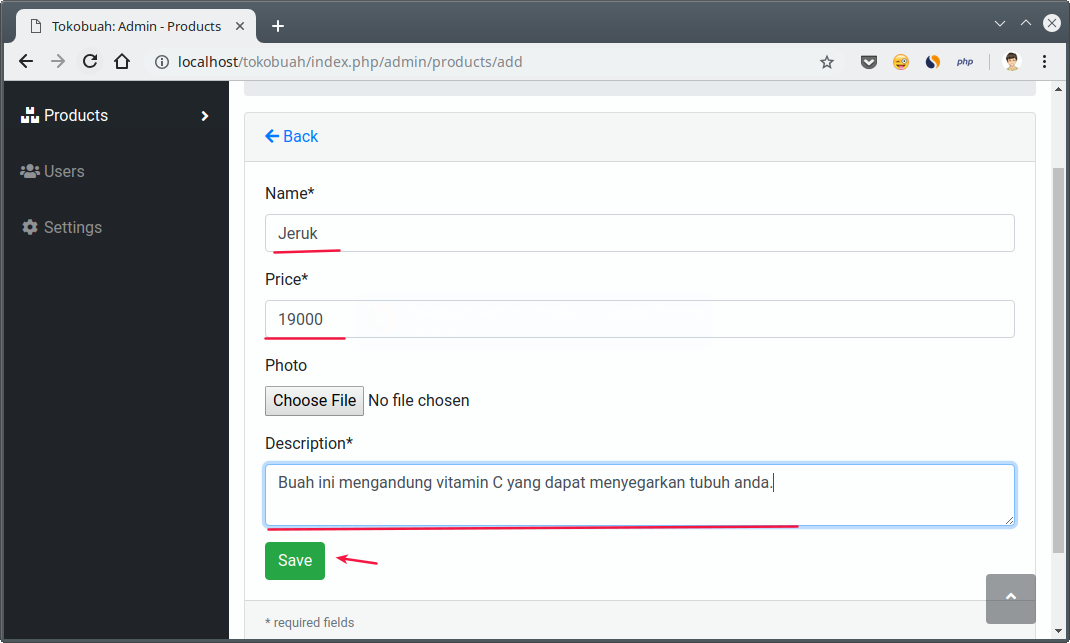
Click Save , if it appears like this ...
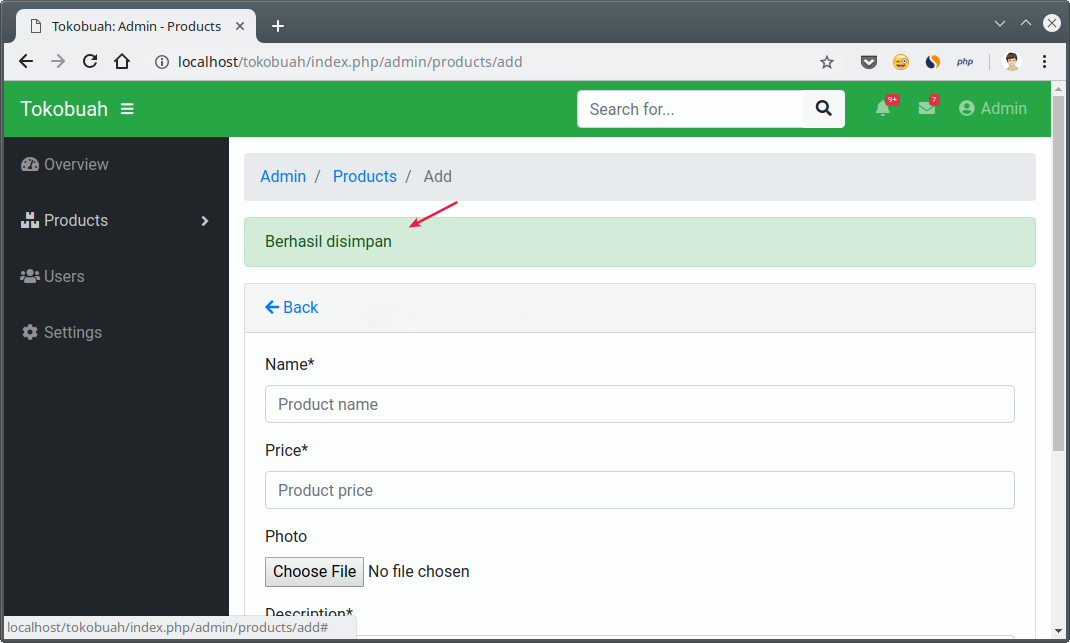
... means that the data was successfully added.
Try checking the products page again .
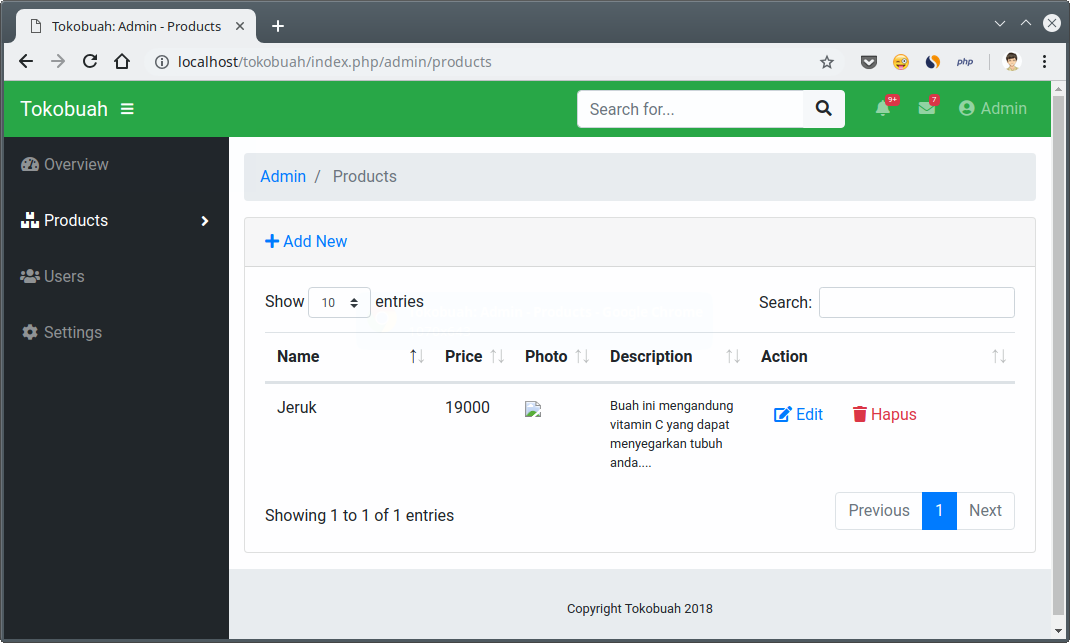
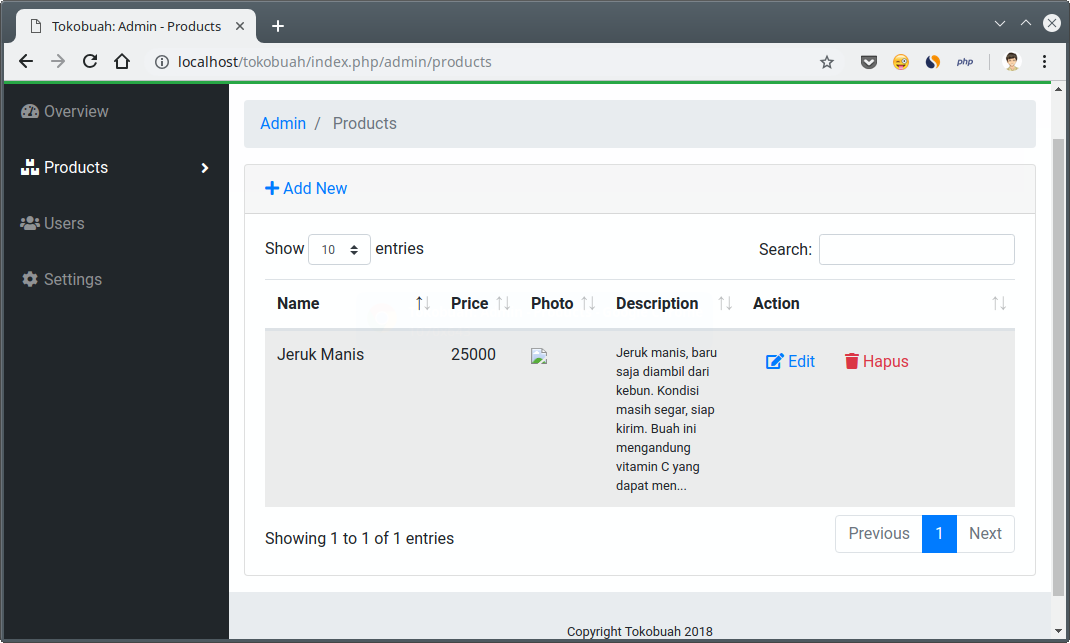
Next try updating the data. Click the Edit button near the Delete button .

The result:
Features for Deleting Data
Finally ...
We have not made a confirmation function on the Deletebutton .
Why do we need confirmation?
Because this action is dangerous.
It could be that there will be a wrong click, if you don't confirm the data can be lost.
And this will certainly be a bad experience for the user.
Actually at this stage, we will only create one Javascript function.
Because we call it on the Delete button .
Pay attention to the view
list.php.<a onclick="deleteConfirm('<?php echo site_url('admin/products/delete/'.$product->product_id) ?>')"
href="#!" class="btn btn-small text-danger"><i class="fas fa-trash"></i> Hapus</a>
There is an onclick event that will call the function
deleteConfirm(). This is a javascript function, not PHP.
This function will then display a confirmation capital.
Okay, but where are we going to write Javascript code?
There are two places that we can use:
- Embed directly in view;
- Make separate Javascript files.
We will use the first method, because the functions we need will only be used in the view
product/list.php.
If there is a Javascript function that is used in some views, you should create a separate file.
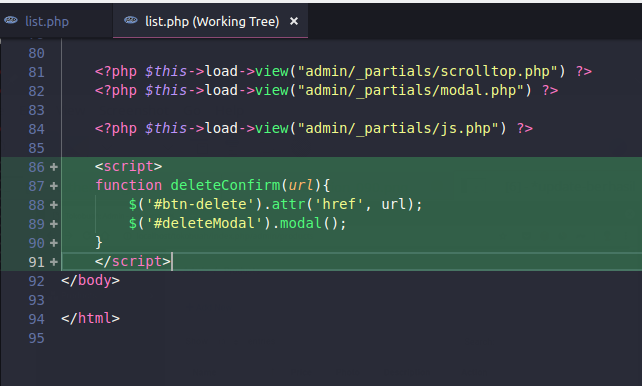
Okay, please open the file
views/admin/product/list.php, then add the following code at the bottom, before closing <body>.<script>
function deleteConfirm(url){
$('#btn-delete').attr('href', url);
$('#deleteModal').modal();
}
</script>
So it will be like this:
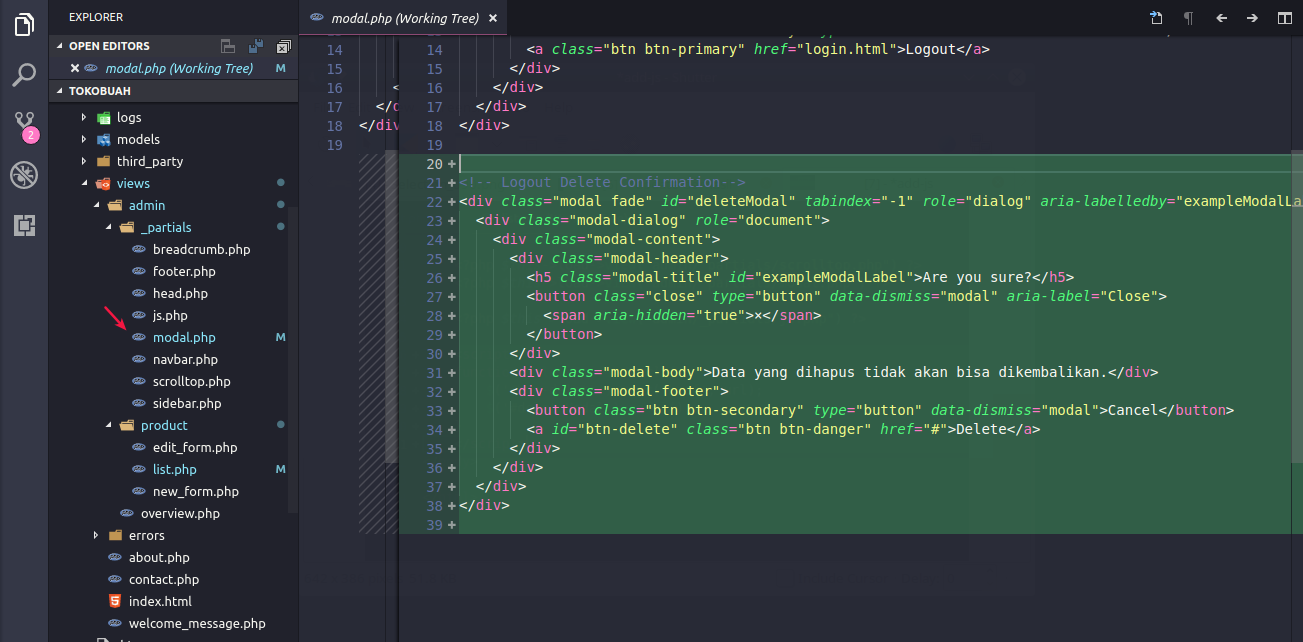
After that, add a capital to delete in the file
views/admin/_partials/modal.php.<!-- Logout Delete Confirmation-->
<div class="modal fade" id="deleteModal" tabindex="-1" role="dialog" aria-labelledby="exampleModalLabel" aria-hidden="true">
<div class="modal-dialog" role="document">
<div class="modal-content">
<div class="modal-header">
<h5 class="modal-title" id="exampleModalLabel">Are you sure?</h5>
<button class="close" type="button" data-dismiss="modal" aria-label="Close">
<span aria-hidden="true">×</span>
</button>
</div>
<div class="modal-body">Data yang dihapus tidak akan bisa dikembalikan.</div>
<div class="modal-footer">
<button class="btn btn-secondary" type="button" data-dismiss="modal">Cancel</button>
<a id="btn-delete" class="btn btn-danger" href="#">Delete</a>
</div>
</div>
</div>
</div>
So it will be like this:
Okay, after that try deleting a data.
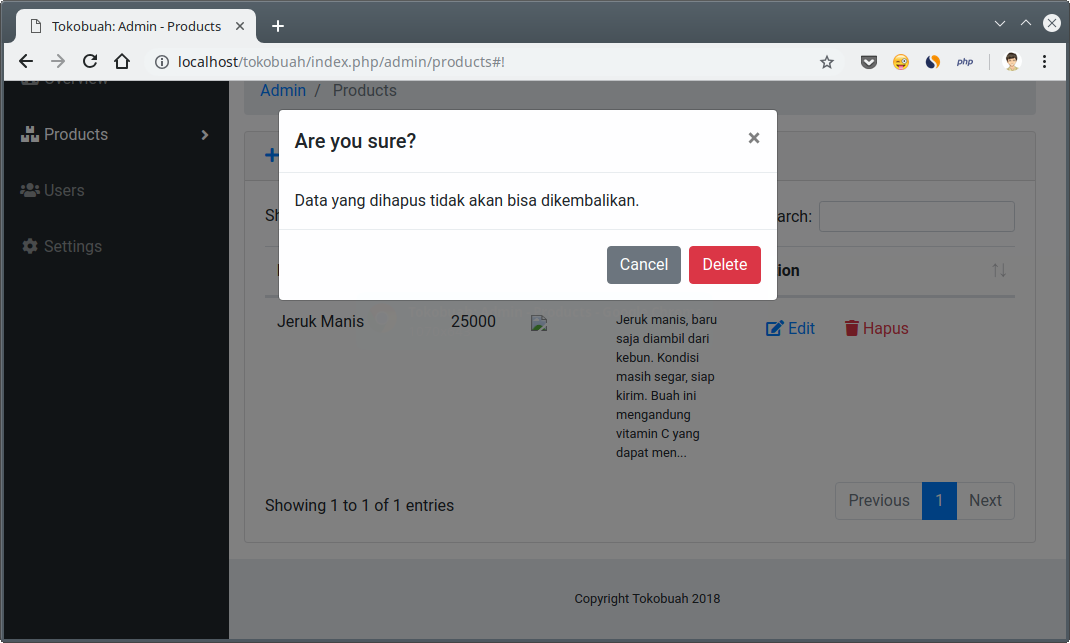
Finally finished…
TODO:
Eitt ... Tungu first.
There is more.


0 Komentar untuk "Codeigniter Tutorial # 5: How to Make the Right CRUD Feature!"
Please comment according to the article